目錄
DHCP Server
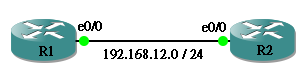
今天討論一下怎樣把 Cisco 路由器設定成 DHCP Server。用以下這個網絡為例,我們會把 R1 設定成 DHCP Server,而 R2 則會成為 DHCP Client,設定完成後 R2 的 e0/0 應可自動完成 IP 設定。
首先在 R1 用 ip dhcp pool <word> 進入 DHCP Server Pool 設定模式,<word> 是為這個 Pool 定義的名字。
R1(config)#ip dhcp pool POOL_1
R1(dhcp-config)#
然後填寫各項 DHCP Server 需要的設定。
hostname R1
!
ip dhcp pool POOL_1
   network 192.168.12.0 255.255.255.0       //要派出去的 IP 範圍
   default-router 192.168.12.1              //Default Gateway
   dns-server 192.168.12.101 192.168.12.102 //DNS Server
   lease 7                                  //租用天數,預設為1天
為了保留一些 IP 不派出去,我們可以用 ip dhcp excluded-address <IP> 進行設定,第一行的意思是保留 192.168.12.1,第二行的意思是保留 192.168.12.101 至 192.168.12.102。
R1(config)#ip dhcp excluded-address 192.168.12.1
R1(config)#ip dhcp excluded-address 192.168.12.101 192.168.12.102
另外,當然要在 e0/0 設定好 IP。
hostname R1
!
interface Ethernet0/0
 ip address 192.168.12.1 255.255.255.0
然後,把 R2 的 e0/0 的 IP Address 設定成 DHCP。
hostname R2
!
interface Ethernet0/0
 ip address dhcp
R2 的 e0/0 成功取得 IP 了。
R2#show interfaces ethernet 0/0 | i Internet
  Internet address is 192.168.12.2/24
在 R1 用 show ip dhcp binding 看看現時 IP 分配情況。最難懂是 Client-ID/Hardware address/User name 一欄,那串奇怪的數字是什麼呢?
R1#show ip dhcp binding
Bindings from all pools not associated with VRF:
IP address          Client-ID/              Lease expiration        Type
                    Hardware address/
                    User name
192.168.12.2        0063.6973.636f.2d63.    Mar 08 2002 01:06 AM    Automatic
                    6330.382e.3266.3430.
                    2e30.3030.302d.4574.
                    302f.30
原來這是一串 Hex code ,只要把他轉回文字,就可以破解出來了!
| HEX | 00 | 63 | 69 | 73 | 63 | 6f | 2d | 63 | 63 | 30 | 38 | 2e | 32 | 66 | 34 | 30 | 2e | 30 | 30 | 30 | 30 | 2d | 45 | 74 | 30 | 2f | 30 |
|---|---|---|---|---|---|---|---|---|---|---|---|---|---|---|---|---|---|---|---|---|---|---|---|---|---|---|---|
| String | c | i | s | c | o | – | c | c | 0 | 8 | . | 2 | f | 4 | 0 | . | 0 | 0 | 0 | 0 | – | E | t | 0 | / | 0 |
迷底解開了,那串文字是 cisco-cc08.2f40.0000-Et0/0,意思 192.168.12.2 這個 IP 是派給了一隻 Cisco 的產品,MAC address 是 cc08.2f40.0000 的 Et0/0 這個 interface 上。
固定 IP
就和一般 DHCP Server 一樣,Cisco 也可以根據不同的 Client 來設定 IP (Static IP),首先我們設定另一個 DHCP Pool,用 host <ip> <mask> 指令來設定要派的 IP,假設我們要派出的 IP 是 192.168.12.201。然後再用 client-identifier 來指定 client,把剛才看到的字串放進去就可以。
hostname R1
!
ip dhcp pool STATIC
   host 192.168.12.201 255.255.255.0
   client-identifier 0063.6973.636f.2d63.6330.382e.3266.3430.2e30.3030.302d.4574.302f.30
然後 DHCP Binding Table 就會出現了一條 Manual 的紀錄,而且 Lease Time 是 Infinite (無限)。
R1#show ip dhcp binding
Bindings from all pools not associated with VRF:
IP address          Client-ID/              Lease expiration        Type
                    Hardware address/
                    User name
192.168.12.201      0063.6973.636f.2d63.    Infinite                Manual
                    6330.382e.3266.3430.
                    2e30.3030.302d.4574.
                    302f.30
在 R2 把 e0/0 重開,得到的 IP 是 192.168.12.201,即我們剛才指定的 IP。
R2(config-if)#shutdown
R2(config-if)#no shutdown
R2(config-if)#end
R2#show interfaces ethernet 0/0 | i Internet
  Internet address is 192.168.12.201/24
DHCP Relay
由於 DHCP 是靠 broadcast 傳送的,如果 DHCP Server 與 DHCP Client 不在同一個網段,就無法連接了。這時候我們可以使用 DHCP Relay (或稱為 IP Helper),幫助 DHCP Client 的 Broadcast 送到 DHCP Server。以下圖這個網絡為例,R1 是 DHCP Server,R3 是 DHCP Client,我們要在 R2 設定 DHCP Relay。

Step 1: 設定 IP Address
hostname R1
!
interface Ethernet0/0
 ip address 192.168.12.1 255.255.255.0
hostname R2
!
interface Ethernet0/0
 ip address 192.168.12.2 255.255.255.0
!
interface Ethernet0/1
 ip address 192.168.23.2 255.255.255.0
Step 2: R1 DHCP 設定
hostname R1
!
ip dhcp excluded-address 192.168.23.1 192.168.23.10
!
ip dhcp pool POOL_2
   network 192.168.23.0 255.255.255.0
   default-router 192.168.23.2
Step 3: Routing
IP Helper 的原理是當 R2 e0/1 收到 R3 的 DHCP broadcast 時,就會以 unicast 傳送給 R1 e0/0,因此 R2 e0/1 必需能到達 R1 e0/0,反之亦然。在這個例子中,我們簡單地用使用 Static Route 達成。
hostname R1
!
ip route 192.168.23.0 255.255.255.0 192.168.12.2
試試 PING 一下,OK了!
R2#ping 192.168.12.1 source 192.168.23.2
Type escape sequence to abort.
Sending 5, 100-byte ICMP Echos to 192.168.12.1, timeout is 2 seconds:
Packet sent with a source address of 192.168.23.2
!!!!!
Success rate is 100 percent (5/5), round-trip min/avg/max = 16/20/28 ms
Step 4: IP Helper
主角出場,用 ip helper-address <ip>,ip 就填上 DHCP Server 的 IP。
hostname R2
!
interface Ethernet0/1
 ip address 192.168.23.2 255.255.255.0
 ip helper-address 192.168.12.1
於是 R3 成功從 DHCP 取得 IP了!
R3(config)#int ethernet 0/0
R3(config-if)#ip address dhcp
R3(config-if)#no shutdown
R3(config-if)#end
R3#show interface ethernet 0/0 | i Internet
  Internet address is 192.168.23.11/24
DHCP Snooping
由於傳統 DHCP 沒有提供認證,網絡上可能有人自設虛假的 DHCP Server,派出不當的 IP Address,為了防止此問題發生,可以在 Host 與 Server 之間的 Switch 設定 DHCP Snooping。請看以下網絡,R1 是 DHCP Client 提出 DHCP Request,R2 是受信任的 DHCP Server,而 R3 則是虛假的。

要啟動 DHCP Snooping,首先在 SW 用指令 ip dhcp snooping,然後為 vlan 10 開啟 dhcp snooping,指令是 ip dhcp snooping vlan 10。ip dhcp snooping 是總制,ip dhcp snooping vlan 是為個別 vlan 做 snooping 設定。
SW(config)#ip dhcp snooping
SW(config)#ip dhcp snooping vlan 10
然後有一個比較特別的設定就是要關掉 Option 82。Option 82 為 DHCP Server 提供更多的資訊讓 Server 判斷要派出什麼 IP Address,啟動 DHCP Snooping 後 Switch 會預設為 DHCP Request 加上 Option 82,然而 Cisco DHCP Server 預設無法為帶有 Option 82 的 Request 派 IP Address,為方便實驗進行,請把 Snooping 的 Option 82 關掉。
SW(config)#no ip dhcp snooping information option
最後,在連著合法 DHCP Server 的 Interface 上設定 Trust。
SW(config)#int fastEthernet 0/2
(config-if)#ip dhcp snooping trust
確認 FastEthernet 0/2 已開了 Trust,並且 Option 82 已經關掉。
SW#show ip dhcp snooping
Switch DHCP snooping is enabled
DHCP snooping is configured on following VLANs:
10
DHCP snooping is configured on the following Interfaces:

Insertion of option 82 is disabled
   circuit-id format: vlan-mod-port
    remote-id format: MAC
Option 82 on untrusted port is not allowed
Verification of hwaddr field is enabled
Interface                    Trusted     Rate limit (pps)
------------------------     -------     ----------------
FastEthernet0/2              yes         unlimited
於是 Client 從 DHCP Server 得到的 IP Address 就被記錄下來了。由於 Fa0/3 是 untrust,R3 的 DHCP Reply 是會被忽略的。
SW#show ip dhcp snooping binding
MacAddress          IpAddress        Lease(sec)  Type           VLAN  Interface
------------------  ---------------  ----------  -------------  ----  --------------------
00:16:46:8F:C3:C1   172.16.10.3      85973       dhcp-snooping   10    GigabitEthernet1/0/1
Total number of bindings: 1
IP Source Guard
開啟了 DHCP Snooping 後,我們還可以利用 DHCP Snooping Binding Table 去做一個進階的保安設定,就是 IP Source Guard。IP Source Guard 可檢查 Host 使用的 IP Address 是否之前從 DHCP 得到的 IP,如果正確才允許 Port 傳送,避免 Host 手動更改 IP Address。設定指令為:
SW(config)#int fastEthernet 0/1
SW(config-if)#ip verify source
檢查設定:
SW#show ip verify source
Interface  Filter-type  Filter-mode  IP-address       Mac-address        Vlan
---------  -----------  -----------  ---------------  -----------------  ----------
Fa0/1      ip           active       172.16.10.3      permit-all         10
如要進一步對 Mac Address 也作出限制,則可在指令後面加上 Keyword port-security,前題是 Switch Port 必需啟用了 Port Security。有關 Port Security 的設定可參考本文。
SW(config)#int fastEthernet 0/1
SW(config-if)#switchport port-security
SW(config-if)#ip verify source port-security
檢查設定時會見到 Filter-type 變成 ip-mac,代表正檢查 IP Address 及 MAC Address。
TEST01#show ip verify source
Interface  Filter-type  Filter-mode  IP-address       Mac-address        Vlan
---------  -----------  -----------  ---------------  -----------------  ----------
Fa0/1      ip-mac       active       172.16.10.3      0016.468f.c3c1     10
相關主題
Jan Ho 2014-07-24
Posted In: 網絡服務 Services
發佈留言