目錄
前言
用 Tunnel 來連接不同 Site 並建立 Virtual Private Network (VPN) 的傳統做法是使用 Generic Routing Encapsulation (GRE)。但如果大家已經看過本網關於 GRE 的文章,就知道用 GRE 來建立 Spoke-to-spoke Topology 所要設定的 Tunnel 數量相當龐大,比較理想的方法是使用 Dynamic Multipoint VPN (DMVPN)。閱讀本文前讀者必需深入了解 GRE Tunnel 與 Routing Protocol 的運作,例如:EIGRP 和 OSPF 等。
DMVPN 的優點
使用 DMVPN 比傳統的 Point-to-point GRE Tunnel 有以下優勢:
Tunnel Interface 數量大幅減少
比起 GRE 需要為每隻 Hub Router 與 Spoke Router 之間的 VPN 設定獨立的 Tunnel Interface,DMVPN 只需要在每隻 Router 設定一個 mGRE (Multipoint GRE) Interface (不論 VPN Tunnel 數目有多少) 即可實現 Fully Mesh Topology,設定所需時間與複雜性大減。網管人員生活質素大幅提高!
Spoke Router 不需有 Static Public IP
除了 Hub Router 之外,所有 Spoke Router 不再需要 Static IP Address。因為 Spoke Router 透過 Next Hop Resolution Protocol (NHRP) 向 Hub Router 注冊 (Register) 自己的 IP Address。而 Spoke Router 亦可使用 NHRP 向 Hub Router 查詢其他 Spoke Router 的 IP Address。
Spoke Router 設定指令大致相同
所有 Spoke Router 的 Tunnel Interface 設定 99% 相同,只要有一隻 Spoke Router 成功與 Hub Router 建立 Tunnel,基本上其他的 Spoke Router 都可以使用相同的 Tunnel Interface 設定,只需改改 IP Address 便可以了。每有新 Spoke Site 建立,VPN 設定可以極速完成,省下不少時間,網管人員生活質素又再大幅提高!
Next Hop Resolution Protocol (NHRP)
Next Hop Resolution Protocol (NHRP) 是實現 DMVPN 的重要角色。其實並不複雜,說穿了有點像 ARP。ARP 是用作 IP 與 MAC Address 之間的轉換,而 NHRP 則用作 Physical IP 與 Tunnel IP 之間的轉換。話說每隻 Spoke Router 都會把自己的 Physical IP Address (在 NHRP 裡又稱作 Non-broadcast Multi Access (NBMA) Address) 和 Tunnel Address 傳送給 Hub Router (又稱作 NHS),Hub Router 收到這些資訊後,就會建立一個 NHRP Table 儲存起來,當有 Spoke Router 要查詢某 Tunnel Address 的位置時,Hub Router 即可回覆其 NBMA Address 讓 Spoke Router 們能夠直接聯繫。
留意 NHRP 只幫忙把 Tunnel Interface 連接起來,而每個 Spoke Site 裡 Private Network 之間的互通,仍需依賴 Routing Protocol。
DMVPN 分為 Phase 1、2 和 3,每個 Phase 的設定只有少許不同,但結果卻有著很大的差異。本文現在由 Phase 1 開始解釋 DMVPN 的設定及其原理。
DMVPN Phase 1
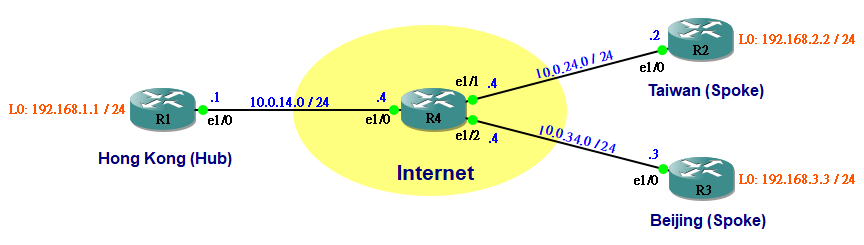
DMVPN Phase 1 只能提供 Hub-to-spoke Topology,即所有 Spoke-to-spoke Data Traffic 都要經過 Hub 來傳送。請看下圖,現在要為 Hong Kong、Taiwan 和 Beijing 三地建立 DMVPN Phase 1。假設 R1 e1/0、R2 e1/0 和 R3 e1/0 已經能夠互相 Ping 通。
以下為 R1 (Hub) 的 Tunnel Interface 設定。
R1(config)#interface Tunnel0
R1(config-if)#ip address 172.16.123.1 255.255.255.0
R1(config-if)#tunnel source Ethernet1/0
R1(config-if)# ! 把 Tunnel 設成 Multipoint Mode
R1(config-if)#tunnel mode gre multipoint
R1(config-if)# ! Network-id 有點像 VLAN 的原理,用來識別不同的 GRE Tunnel,
R1(config-if)# ! 各 Router Network-id 設定必需相同才能互通。
R1(config-if)#ip nhrp network-id 1
R1(config-if)# ! 由於 Routing Protocol 依賴 Multicast 溝通,在此預先設定把 Multicast
R1(config-if)# ! 設定為傳送到所有用 NHRP Dynamic Learn 的 Spoke Router。
R1(config-if)#ip nhrp map multicast dynamic
以下為 R2 (Spoke) 的 Tunnel Interface 設定。
R2(config)#interface Tunnel0
R2(config-if)#ip address 172.16.123.2 255.255.255.0
R2(config-if)#tunnel source Ethernet1/0
R1(config-if)# ! 在 DMVPN Phase 1 只要求所有 Spoke 用傳統 GRE 與 Hub 連線
R2(config-if)#tunnel destination 10.0.14.1
R2(config-if)#ip nhrp network-id 1
R1(config-if)# ! NHS (即 Hub) 的位置
R2(config-if)#ip nhrp nhs 172.16.123.1
R1(config-if)# ! Static 設定 Hub 的 NBMA,只需設定 Hub 而不用設定其他 Spoke 是因為
R1(config-if)# ! Spoke Router 未來會用 NHRP 向 Hub 查詢其他 Spoke Router 的位置
R2(config-if)#ip nhrp map 172.16.123.1 10.0.14.1
R1(config-if)# ! 用作 Routing Protocol 溝通的 Multicast Traffic 全部傳到 Hub
R2(config-if)#ip nhrp map multicast 10.0.14.1
設定完成後,在 R1 用指令 show dmvpn 可以看到 R2 已向 R1 注冊自己的 NBMA 和 Tunnel Address,R1 亦已把這些資料記錄起來。
R1#show dmvpn
Legend: Attrb --> S - Static, D - Dynamic, I - Incomplete
        N - NATed, L - Local, X - No Socket
        # Ent --> Number of NHRP entries with same NBMA peer
        NHS Status: E --> Expecting Replies, R --> Responding
        UpDn Time --> Up or Down Time for a Tunnel
==========================================================================

Interface: Tunnel0, IPv4 NHRP Details
Type:Hub, NHRP Peers:1,

 # Ent  Peer NBMA Addr Peer Tunnel Add State  UpDn Tm Attrb
 ----- --------------- --------------- ----- -------- -----
     1       10.0.24.2    172.16.123.2    UP 00:01:36     D
另一個可以用來確認的指令是 show ip nhrp。
R1#show ip nhrp
172.16.123.2/32 via 172.16.123.2
   Tunnel0 created 00:02:06, expire 01:57:53
   Type: dynamic, Flags: unique registered
   NBMA address: 10.0.24.2
所以 R1 和 R2 的 Tunnel Interface 已經可以 ping 通了。
R2#ping 172.16.123.1 source 172.16.123.2

Type escape sequence to abort.
Sending 5, 100-byte ICMP Echos to 172.16.123.1, timeout is 2 seconds:
!!!!!
Success rate is 100 percent (5/5), round-trip min/avg/max = 16/40/72 ms
確認沒問題的話,只需把 R2 的設定,稍微更改一下 Tunnel IP Address,然後直接放進 R3 便可。
R3(config)#interface Tunnel0
R3(config-if)#ip address 172.16.123.3 255.255.255.0
R3(config-if)#tunnel source Ethernet1/0
R3(config-if)#tunnel destination 10.0.14.1
R3(config-if)#ip nhrp network-id 1
R3(config-if)#ip nhrp nhs 172.16.123.1
R3(config-if)#ip nhrp map 172.16.123.1 10.0.14.1
R3(config-if)#ip nhrp map multicast 10.0.14.1
如此一來,就算有 100 個、1000 個 Spoke Site,設定都變得輕鬆了。
R3#ping 172.16.123.2 source 172.16.123.3

Type escape sequence to abort.
Sending 5, 100-byte ICMP Echos to 172.16.123.2, timeout is 2 seconds:
!!!!!
Success rate is 100 percent (5/5), round-trip min/avg/max = 24/128/356 ms
R3#
R3#ping 172.16.123.1 source 172.16.123.3

Type escape sequence to abort.
Sending 5, 100-byte ICMP Echos to 172.16.123.1, timeout is 2 seconds:
!!!!!
Success rate is 100 percent (5/5), round-trip min/avg/max = 12/26/40 ms
設定 Routing Protocol
Tunnel Interface 能夠互通後,便可以設定 Routing Protocol 以交換各 Spoke Site 的 Route。以 EIGRP 為例子,只需簡單設定幾個 Network 指令,唯一要注意的是 R1 的 Tunnel 0 interface 要做多一點工夫。由於 R2 把 Route 傳給 R1 的 Tunnel 0,預設情況下,基於 Split Horizon 規則,R1 無法把 Route 回傳給 R3,反之亦然。因此要在 Tunnel 0 把 Split Horizon 關掉。
R1(config)#router eigrp 1
R1(config-router)#no auto-summary
R1(config-router)#network 172.16.123.0 0.0.0.255
R1(config-router)#network 192.168.1.0 0.0.0.255
R1(config-router)#exit
R1(config)#interface tunnel 0
R1(config-if)#no ip split-horizon eigrp 1
R2(config)#router eigrp 1
R2(config-router)#no auto-summary
R2(config-router)#network 172.16.123.0 0.0.0.255
R2(config-router)#network 192.168.2.0 0.0.0.255
R3(config)#router eigrp 1
R3(config-router)#no auto-summary
R3(config-router)#network 172.16.123.0 0.0.0.255
R3(config-router)#network 192.168.3.0 0.0.0.255
確認一下大家都收到 EIGRP 傳來的 Route。
R1#show ip route eigrp 1
Codes: L - local, C - connected, S - static, R - RIP, M - mobile, B - BGP
       D - EIGRP, EX - EIGRP external, O - OSPF, IA - OSPF inter area
       N1 - OSPF NSSA external type 1, N2 - OSPF NSSA external type 2
       E1 - OSPF external type 1, E2 - OSPF external type 2
       i - IS-IS, su - IS-IS summary, L1 - IS-IS level-1, L2 - IS-IS level-2
       ia - IS-IS inter area, * - candidate default, U - per-user static route
       o - ODR, P - periodic downloaded static route, + - replicated route

Gateway of last resort is not set

D     192.168.2.0/24 [90/27008000] via 172.16.123.2, 00:49:55, Tunnel0
D     192.168.3.0/24 [90/27008000] via 172.16.123.3, 00:49:54, Tunnel0
R2#show ip route eigrp 1
Codes: L - local, C - connected, S - static, R - RIP, M - mobile, B - BGP
       D - EIGRP, EX - EIGRP external, O - OSPF, IA - OSPF inter area
       N1 - OSPF NSSA external type 1, N2 - OSPF NSSA external type 2
       E1 - OSPF external type 1, E2 - OSPF external type 2
       i - IS-IS, su - IS-IS summary, L1 - IS-IS level-1, L2 - IS-IS level-2
       ia - IS-IS inter area, * - candidate default, U - per-user static route
       o - ODR, P - periodic downloaded static route, + - replicated route

Gateway of last resort is not set

D     192.168.1.0/24 [90/27008000] via 172.16.123.1, 00:48:54, Tunnel0
D     192.168.3.0/24 [90/28288000] via 172.16.123.1, 00:04:11, Tunnel0
R3#show ip route eigrp 1
Codes: L - local, C - connected, S - static, R - RIP, M - mobile, B - BGP
       D - EIGRP, EX - EIGRP external, O - OSPF, IA - OSPF inter area
       N1 - OSPF NSSA external type 1, N2 - OSPF NSSA external type 2
       E1 - OSPF external type 1, E2 - OSPF external type 2
       i - IS-IS, su - IS-IS summary, L1 - IS-IS level-1, L2 - IS-IS level-2
       ia - IS-IS inter area, * - candidate default, U - per-user static route
       o - ODR, P - periodic downloaded static route, + - replicated route

Gateway of last resort is not set

D     192.168.1.0/24 [90/27008000] via 172.16.123.1, 00:49:37, Tunnel0
D     192.168.2.0/24 [90/28288000] via 172.16.123.1, 00:04:55, Tunnel0
留意各 Route 的 Next Hop, R2 需要經 R1 才能到達 R3,同樣地 R3 需要經 R1 才能到達 R2。
R2#traceroute 192.168.3.3 source 192.168.2.2

Type escape sequence to abort.
Tracing the route to 192.168.3.3

  1 172.16.123.1 12 msec 36 msec 44 msec
  2 172.16.123.3 72 msec 68 msec 64 msec

R2#
R2#show ip cef 192.168.3.0/24
192.168.3.0/24
  nexthop 172.16.123.1 Tunnel0
Summary Route
在 DMVPN Phase 1,由於我們知道所有 Spoke-to-spoke Traffic 都必先經 Hub 才能到達,Spoke Router 收到由其他 Spoke Router 傳來的 Route 變得意義不大,反正都要先經 Hub,我們大可以在 Hub 發佈 Summary Route 來減少 Spoke Router 的 Route 數量。
R1(config-if)#ip summary-address eigrp 1 192.168.0.0 255.255.252.0
於是,所有 Spoke Router 只會收到一條 Summary Route 指向 Hub。
R2#show ip route eigrp
Codes: L - local, C - connected, S - static, R - RIP, M - mobile, B - BGP
       D - EIGRP, EX - EIGRP external, O - OSPF, IA - OSPF inter area
       N1 - OSPF NSSA external type 1, N2 - OSPF NSSA external type 2
       E1 - OSPF external type 1, E2 - OSPF external type 2
       i - IS-IS, su - IS-IS summary, L1 - IS-IS level-1, L2 - IS-IS level-2
       ia - IS-IS inter area, * - candidate default, U - per-user static route
       o - ODR, P - periodic downloaded static route, + - replicated route

Gateway of last resort is not set

D     192.168.0.0/22 [90/27008000] via 172.16.123.1, 00:00:44, Tunnel0
R3#show ip route eigrp 1
Codes: L - local, C - connected, S - static, R - RIP, M - mobile, B - BGP
       D - EIGRP, EX - EIGRP external, O - OSPF, IA - OSPF inter area
       N1 - OSPF NSSA external type 1, N2 - OSPF NSSA external type 2
       E1 - OSPF external type 1, E2 - OSPF external type 2
       i - IS-IS, su - IS-IS summary, L1 - IS-IS level-1, L2 - IS-IS level-2
       ia - IS-IS inter area, * - candidate default, U - per-user static route
       o - ODR, P - periodic downloaded static route, + - replicated route

Gateway of last resort is not set

D     192.168.0.0/22 [90/27008000] via 172.16.123.1, 00:01:36, Tunnel0
留意這招在 RIP 和 EIGRP 等 Distance Vector 特性的 Routing Protocol 中使用比較方便,如果要在 OSPF 中使用則變得困難,因為 OSPF 只能在 ABR 或 ASBR 發佈 Summary Route。
DMVPN Phase 2
很明顯,DMVPN Phase 1 的缺點在於所有 Spoke-to-spoke 的 Data Traffic 必先經過 Hub,因為 Spoke Router 只與 Hub Router 建立 Tunnel。升級至 Phase 2 則可建立 Spoke-to-spoke Tunnel (Fully Mesh) 讓 Data Traffic 直接由 Spoke Router 到達另一隻 Spoke Router。
R2(config)#interface tunnel 0
R2(config-if)#no tunnel destination
R2(config-if)# ! 把 Tunnel 改成 Multipoint Mode
R2(config-if)#tunnel mode gre multipoint
R3(config)#interface tunnel 0
R3(config-if)#no tunnel destination
R3(config-if)# ! 把 Tunnel 改成 Multipoint Mode
R3(config-if)#tunnel mode gre multipoint
然後必需把所有 Tunnel Interface Shutdown,先重開 Hub Router 的 Tunnel Interface,再重開各 Spoke Router 的 Tunnel Interface,設定才會生效。完成設定之後再做一次 Traceroute。
R2#traceroute 172.16.123.3

Type escape sequence to abort.
Tracing the route to 172.16.123.3

  1 172.16.123.1 36 msec 12 msec
    172.16.123.3 44 msec
為什麼仍然要經過 Hub?再做一次看看。發現 CEF Table 的指向已經被直接更新了,這當然是拜 NHRP 所賜。
R2#traceroute 172.16.123.3

Type escape sequence to abort.
Tracing the route to 172.16.123.3

  1 172.16.123.3 32 msec 20 msec 20 msec
R2#
R2#show ip cef 172.16.123.3
172.16.123.3/32
  attached to Tunnel0
由於 Spoke 已經可以直接到達其他 Spoke,剛才我們設的那條 Summary Route 已經不合時,趕快把它拿掉。另一方面,我們不再希望 Data Traffic 跑到 Hub 這邊來了,所以要關掉 next-hop-self。
R1(config-if)#no ip summary-address eigrp 1 192.168.0.0 255.255.252.0
R1(config-if)#no ip next-hop-self eigrp 1
現在 Spoke Router 裡 Route 的 Next Hop 都會直接指向目的地。
R2#show ip route eigrp 1
Codes: L - local, C - connected, S - static, R - RIP, M - mobile, B - BGP
       D - EIGRP, EX - EIGRP external, O - OSPF, IA - OSPF inter area
       N1 - OSPF NSSA external type 1, N2 - OSPF NSSA external type 2
       E1 - OSPF external type 1, E2 - OSPF external type 2
       i - IS-IS, su - IS-IS summary, L1 - IS-IS level-1, L2 - IS-IS level-2
       ia - IS-IS inter area, * - candidate default, U - per-user static route
       o - ODR, P - periodic downloaded static route, + - replicated route

Gateway of last resort is not set

D     192.168.1.0/24 [90/27008000] via 172.16.123.1, 00:00:18, Tunnel0
D     192.168.3.0/24 [90/28288000] via 172.16.123.3, 00:00:18, Tunnel0
R3#show ip route eigrp 1
Codes: L - local, C - connected, S - static, R - RIP, M - mobile, B - BGP
       D - EIGRP, EX - EIGRP external, O - OSPF, IA - OSPF inter area
       N1 - OSPF NSSA external type 1, N2 - OSPF NSSA external type 2
       E1 - OSPF external type 1, E2 - OSPF external type 2
       i - IS-IS, su - IS-IS summary, L1 - IS-IS level-1, L2 - IS-IS level-2
       ia - IS-IS inter area, * - candidate default, U - per-user static route
       o - ODR, P - periodic downloaded static route, + - replicated route

Gateway of last resort is not set

D     192.168.1.0/24 [90/27008000] via 172.16.123.1, 00:00:54, Tunnel0
D     192.168.2.0/24 [90/28288000] via 172.16.123.2, 00:00:52, Tunnel0
Traceroute 一下便可確認 Spoke-to-spoke Connection 達成!
R2#traceroute 192.168.3.3 source 192.168.2.2

Type escape sequence to abort.
Tracing the route to 192.168.3.3

  1 172.16.123.3 8 msec 40 msec 32 msec
R3#traceroute 192.168.2.2 source 192.168.3.3

Type escape sequence to abort.
Tracing the route to 192.168.2.2

  1 172.16.123.2 16 msec 36 msec 40 msec
DMVPN Phase 3
DMVPN Phase 2 的優點是能夠實現 Spoke-to-spoke 連線,可惜卻不能使用 Summary Route。這是因為當我們在 Hub 發佈 Summary Route,所有 Traffic 又跑回來 Hub 了。所以魚與熊掌,不可兼得嗎?答案是可以的,就是使用 DMVPN Phase 3。
R1(config)#interface tunnel 0
R1(config-if)# ! 首先在 Hub 設定 Summary Route 和 next-hop-self 把 Data Traffic 搶回來
R1(config-if)#ip summary-address eigrp 1 192.168.0.0 255.255.252.0
R1(config-if)#ip next-hop-self eigrp 1
R1(config-if)# ! 加入這個指令便完成設定 Phase 3,一會再解說
R1(config-if)#ip nhrp redirect
而所有 Spoke 則加入 ip nhrp shortcut 指令,記得要重啟所有 Tunnel Interface。
R2(config)#interface tunnel 0
R2(config-if)#ip nhrp shortcut
R3(config)#interface tunnel 0
R3(config-if)#ip nhrp shortcut
看 R2 的 Route Table,指向 Hub 了。
R2#show ip route eigrp 1
Codes: L - local, C - connected, S - static, R - RIP, M - mobile, B - BGP
       D - EIGRP, EX - EIGRP external, O - OSPF, IA - OSPF inter area
       N1 - OSPF NSSA external type 1, N2 - OSPF NSSA external type 2
       E1 - OSPF external type 1, E2 - OSPF external type 2
       i - IS-IS, su - IS-IS summary, L1 - IS-IS level-1, L2 - IS-IS level-2
       ia - IS-IS inter area, * - candidate default, U - per-user static route
       o - ODR, P - periodic downloaded static route, + - replicated route

Gateway of last resort is not set

D     192.168.0.0/22 [90/27008000] via 172.16.123.1, 00:00:14, Tunnel0
R2#
R2#show ip cef 192.168.3.0/24
192.168.3.0/24
  nexthop 172.16.123.1 Tunnel0
做一次 Traceroute 後,Traffic 果然去了 Hub。
R2#traceroute 192.168.3.3 source 192.168.2.2

Type escape sequence to abort.
Tracing the route to 192.168.3.3

  1 172.16.123.1 20 msec 36 msec 36 msec
  2 172.16.123.3 68 msec 64 msec 48 msec
但再做一次的話,發現結果已經不同了,Traffic 直接由 R2 到 R3。因為 NHRP 已經幫我們查詢了 R3 的位置。Hub 的 ip nhrp redirect 指令幫我們更新 Spoke,而 Spoke 的 ip nhrp shortcut 指令則表示接受這更新。
R2#traceroute 192.168.3.3 source 192.168.2.2

Type escape sequence to abort.
Tracing the route to 192.168.3.3

  1 172.16.123.3 64 msec 60 msec 16 msec
R2#
R2#show ip nhrp
172.16.123.1/32 via 172.16.123.1
   Tunnel0 created 00:00:37, never expire
   Type: static, Flags: used
   NBMA address: 10.0.14.1
192.168.3.3/32 via 172.16.123.3
   Tunnel0 created 00:00:01, expire 01:59:58
   Type: dynamic, Flags: router used
   NBMA address: 10.0.34.3
DMVPN 與 OSPF
OSPF 與 DMVPN 的相容性較 EIGRP 和 RIP 低,不太建議使用,如果堅持使用 OSPF 的話,則需注意以下要點。
強制 Hub 成為 DR
由於 Spoke 與 Spoke 之間的 Multicast 不互通,所以 Spoke 之間無法成為 Neighbor,幸好 OSPF Router 只需和 DR 溝通即可同步 OSPF Database。因此,在 DMVPN 使用 OSPF 必需把 Hub 設定成 DR,最有效的方法是把 Spoke Router 的 priority 設成 0 使其無法參與 DR 選舉。
R2(config)#interface tunnel 0
R2(config-if)#ip ospf priority 0
當然我們可以把 OSPF Network Type 改成 Multipoint Broadcast 去禁止 DR 選舉,但這樣就讓 Spoke-to-spoke Topology 無法建立了。
Summary Route 有困難
DMVPN Phase 3 的精綷在於發佈 Summary Route 讓 Spoke Router 的 Route 數量減少,但 OSPF 只能在 ABR 和 ASBR 發佈 Summary Route,所以當所有 Spoke 和 Hub 都在同一個 Area 裡,Phase 3 是無法達成的,只能使用 Phase 2 了。當然我們可以故意把每一個 Spoke 放在不同 Area 使 Hub 成為 ABR,但設定相當複雜,與 DMVPN 簡單設定的目標背道而馳。
Tunnel 認證
由於只要知道 NHRP 的 IP 便可與之建立 Tunnel,基於保安理由,我們可以在 Tunnel 加入一些認證,第一個方法是 Tunnel Key。設置相同 Tunnel Key 的 Tunnel 方可成功建立,設定如下。
R1(config)#int tunnel 0
R1(config-if)#tunnel key 1234
R2(config)#int tunnel 0
R2(config-if)#tunnel key 1234
另外,在 NHRP 也可以加 Key 去做認證,Spoke 必需知道 Key 才可以向 Hub 注冊,設定 key 後需要重啟 Tunnel Interface。
R1(config)#int tunnel 0
R1(config-if)#ip nhrp authentication ccie
R2(config)#int tunnel 0
R2(config-if)#ip nhrp authentication ccie
IPSec
最後,我們可以用 IPSec 加密去保護資訊。設定上跟 GRE Tunnel 的 IPSec 沒大分別,但由於每一個 Spoke-to-spoke Connection 和 Hub-to-spoke Connection 都會建 IPSec,要留意 isakmp key 希望設定成全部一樣,還是希望每一個 destination 皆不同 (將會是惡夢 😥 ),如果全部一樣的話,destination address 可用 0.0.0.0 0.0.0.0。
首先在 R1、R2 和 R3 都設定 IKE Phase 1 參數,詳細說明請參考這裡。
R1(config)#crypto isakmp policy 10
R1(config-isakmp)#authentication pre-share
然後分別在 R1、R2 和 R3 設定 Phase 2 參數,詳細說明請參考這裡。
R1(config)#crypto ipsec transform-set TS esp-3des esp-sha-hmac
R1(cfg-crypto-trans)#exit
然後分別在 R1、R2 和 R3 設定 Pre-share Key,假設全部 Connection 使用相同的 Key。
R1(config)#crypto isakmp key ccie address 0.0.0.0 0.0.0.0
跟著,分別在 R1、R2 和 R3 定義 IPSec Profile。
R1(config)#crypto ipsec profile PF
R1(ipsec-profile)#set transform-set TS
最後在所有 Tunnel 都設定使用 IPSec Profile。
R1(config)#interface tunnel 0
R1(config-if)#tunnel protection ipsec PRofile PF
DMVPN 與 GETVPN 之比較
GETVPN 與 DMVPN 都有著簡化 Remote Site 設定的效果,而 DMVPN 比 GETVPN 較好的地方是在 Internet 的支緩。對於 Internet 上的 VPN Router,GETVPN 是無能為力的,因為 GETVPN 的 Tunnel Mode 為 IP Header Preservation,而 Private IP Address 無法在 Internet 上被 Route。這情況便得使用 DMVPN 了。
相關主題
Jan Ho 2017-07-09
Posted In: 虛擬私人網路 VPN
發佈留言