前言
Generic Routing Encapsulation (GRE) 可以在兩個 Physical Interface 之間建立點對點 Tunnel,多用於設置 Virtual Private Network (VPN) 去保護資訊。本文會先介紹 GRE Tunnel 的設定方法,最後在 GRE 上加上 IPSec 設定去做認證和加密。
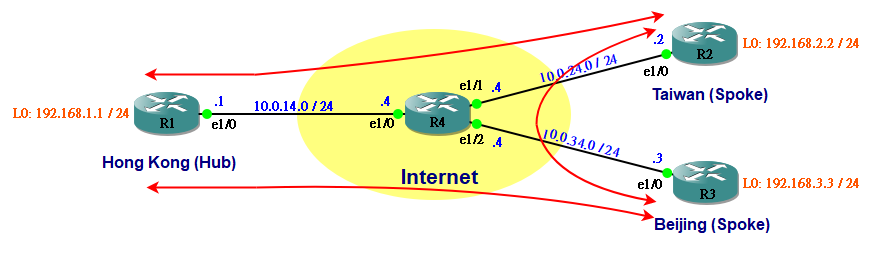
Hub-to-spoke Topology
請看下圖,現在要為 Hong Kong、Taiwan 和 Beijing 三地建立 GRE Tunnel。假設 R1 e1/0、R2 e1/0 和 R3 e1/0 已經能夠互相 Ping 通。

首先,在 R1 和 R2 之間建立 Tunnel。
R1(config)#int tunnel 12
R1(config-if)#ip address 172.16.12.1 255.255.255.0
R1(config-if)#tunnel source ethernet 1/0
R1(config-if)#tunnel destination 10.0.24.2
R2(config)#int tunnel 12
R2(config-if)#ip address 172.16.12.2 255.255.255.0
R2(config-if)#tunnel source ethernet 1/0
R2(config-if)#tunnel destination 10.0.14.1
同樣地,在 R1 與 R3 之間建立 Tunnel。
R1(config)#int tunnel 13
R1(config-if)#ip address 172.16.13.1 255.255.255.0
R1(config-if)#tunnel source ethernet 1/0
R1(config-if)#tunnel destination 10.0.34.3
R3(config)#int tunnel 13
R3(config-if)#ip address 172.16.13.3 255.255.255.0
R3(config-if)#tunnel source ethernet 1/0
R3(config-if)#tunnel destination 10.0.14.1
確認一下,R1 已經可以 Ping 通 R2 和 R3 的 Tunnel Interface 了。
R1#ping 172.16.12.2 source 172.16.12.1

Type escape sequence to abort.
Sending 5, 100-byte ICMP Echos to 172.16.12.2, timeout is 2 seconds:
Packet sent with a source address of 172.16.12.1
!!!!!
Success rate is 100 percent (5/5), round-trip min/avg/max = 12/22/32 ms
R1#
R1#ping 172.16.13.3 source 172.16.12.1

Type escape sequence to abort.
Sending 5, 100-byte ICMP Echos to 172.16.13.3, timeout is 2 seconds:
Packet sent with a source address of 172.16.12.1
!!!!!
Success rate is 100 percent (5/5), round-trip min/avg/max = 12/19/24 ms
R2 的 Interface Tunnel 同樣可以 Ping 通 R3 的 Tunnel Interface,但留意路徑是 R2 > R1 > R3,因為這是 Hub-to-spoke Topology。
R2#ping 172.16.13.3 source 172.16.12.2

Type escape sequence to abort.
Sending 5, 100-byte ICMP Echos to 172.16.13.3, timeout is 2 seconds:
Packet sent with a source address of 172.16.12.2
!!!!!
Success rate is 100 percent (5/5), round-trip min/avg/max = 20/64/104 ms
R2#
R2#traceroute 172.16.13.3 source 172.16.12.2

Type escape sequence to abort.
Tracing the route to 172.16.13.3

  1 172.16.12.1 8 msec 40 msec 36 msec
  2 172.16.13.3 60 msec 32 msec 72 msec
Routing Protocol
然後,我們可以用 Routing Protocol 把各 Router 背後的網絡互相發佈,例如使用 EIGRP。
R1(config)#router eigrp 1
R1(config-router)network 172.16.12.0 0.0.0.255
R1(config-router)network 172.16.13.0 0.0.0.255
R1(config-router)network 192.168.1.0
R1(config-router)#no auto-summary
R2(config)#router eigrp 1
R2(config-router)network 172.16.12.0 0.0.0.255
R2(config-router)network 192.168.2.0
R2(config-router)#no auto-summary
R3(config)#router eigrp 1
R3(config-router)network 172.16.13.0 0.0.0.255
R3(config-router)network 192.168.3.0
R3(config-router)#no auto-summary
Route Table 已經可以看到 EIGRP 成功交換 Route。
R1#show ip route eigrp 1
Codes: L - local, C - connected, S - static, R - RIP, M - mobile, B - BGP
       D - EIGRP, EX - EIGRP external, O - OSPF, IA - OSPF inter area
       N1 - OSPF NSSA external type 1, N2 - OSPF NSSA external type 2
       E1 - OSPF external type 1, E2 - OSPF external type 2
       i - IS-IS, su - IS-IS summary, L1 - IS-IS level-1, L2 - IS-IS level-2
       ia - IS-IS inter area, * - candidate default, U - per-user static route
       o - ODR, P - periodic downloaded static route, + - replicated route

Gateway of last resort is not set

D     192.168.2.0/24 [90/27008000] via 172.16.12.2, 00:12:30, Tunnel12
D     192.168.3.0/24 [90/27008000] via 172.16.13.3, 00:12:53, Tunnel13
R1#
R1#ping 192.168.2.2 source 192.168.1.1

Type escape sequence to abort.
Sending 5, 100-byte ICMP Echos to 192.168.2.2, timeout is 2 seconds:
Packet sent with a source address of 192.168.1.1
!!!!!
Success rate is 100 percent (5/5), round-trip min/avg/max = 16/19/24 ms
R1#
R1#ping 192.168.3.3 source 192.168.1.1

Type escape sequence to abort.
Sending 5, 100-byte ICMP Echos to 192.168.3.3, timeout is 2 seconds:
Packet sent with a source address of 192.168.1.1
!!!!!
Success rate is 100 percent (5/5), round-trip min/avg/max = 12/28/40 ms
留意 R2 的 192.168.2.0/24 要到達 192.168.3.0/24,仍要途經 R1。
R2#show ip route eigrp 1
Codes: L - local, C - connected, S - static, R - RIP, M - mobile, B - BGP
       D - EIGRP, EX - EIGRP external, O - OSPF, IA - OSPF inter area
       N1 - OSPF NSSA external type 1, N2 - OSPF NSSA external type 2
       E1 - OSPF external type 1, E2 - OSPF external type 2
       i - IS-IS, su - IS-IS summary, L1 - IS-IS level-1, L2 - IS-IS level-2
       ia - IS-IS inter area, * - candidate default, U - per-user static route
       o - ODR, P - periodic downloaded static route, + - replicated route

Gateway of last resort is not set

      172.16.0.0/16 is variably subnetted, 3 subnets, 2 masks
D        172.16.13.0/24 [90/28160000] via 172.16.12.1, 00:15:07, Tunnel0
D     192.168.1.0/24 [90/27008000] via 172.16.12.1, 00:15:07, Tunnel0
D     192.168.3.0/24 [90/28288000] via 172.16.12.1, 00:15:07, Tunnel0
R2#
R2#traceroute 172.16.13.3 source 172.16.12.2

Type escape sequence to abort.
Tracing the route to 172.16.13.3

  1 172.16.12.1 12 msec 36 msec 40 msec
  2 172.16.13.3 64 msec 44 msec 48 msec
Fully Mesh Topology
Hub-to-spoke Topology 設定較簡單,問題在於 Spoke 連接 Spoke 需要透過 Hub,這樣會造成浪費 Bandwidth 及延長回應時間。要解決這個問題,可改用 Fully Mesh Topology。以剛才的網絡為例,只要在 R2 與 R3 之間增加一條 Tunnel 即可。
R2(config)#int tunnel 23
R2(config-if)#ip address 172.16.23.2 255.255.255.0
R2(config-if)#tunnel source ethernet 1/0
R2(config-if)#tunnel destination 10.0.34.3
R3(config)#int tunnel 23
R3(config-if)#ip address 172.16.23.3 255.255.255.0
R3(config-if)#tunnel source ethernet 1/0
R3(config-if)#tunnel destination 10.0.24.2
當然我們要分別在 R2 和 R3 的 EIGRP 設定加入新的 Network,讓 R2 和 R3 建立 EIGRP Adjacency。
R2(config)#router eigrp 1
R2(config-router)#network 172.16.23.0 0.0.0.255
R3(config)#router eigrp 1
R3(config-router)#network 172.16.23.0 0.0.0.255
於是 R2 便能直接到達 R3 而不需途經 R1。
R2#show ip route eigrp 1
Codes: L - local, C - connected, S - static, R - RIP, M - mobile, B - BGP
       D - EIGRP, EX - EIGRP external, O - OSPF, IA - OSPF inter area
       N1 - OSPF NSSA external type 1, N2 - OSPF NSSA external type 2
       E1 - OSPF external type 1, E2 - OSPF external type 2
       i - IS-IS, su - IS-IS summary, L1 - IS-IS level-1, L2 - IS-IS level-2
       ia - IS-IS inter area, * - candidate default, U - per-user static route
       o - ODR, P - periodic downloaded static route, + - replicated route

Gateway of last resort is not set

      172.16.0.0/16 is variably subnetted, 5 subnets, 2 masks
D        172.16.13.0/24 [90/28160000] via 172.16.23.3, 00:00:44, Tunnel23
                        [90/28160000] via 172.16.12.1, 00:00:44, Tunnel12
D     192.168.1.0/24 [90/27008000] via 172.16.12.1, 00:00:44, Tunnel12
D     192.168.3.0/24 [90/27008000] via 172.16.23.3, 00:00:44, Tunnel23
R2#
R2#traceroute 192.168.3.3 source 192.168.2.2

Type escape sequence to abort.
Tracing the route to 192.168.3.3

  1 172.16.23.3 28 msec 40 msec 20 msec
IPSec over GRE Tunnel
最後我們嘗試在所有 Tunnel 之間用 IPSec 加密。
首先在 R1、R2 和 R3 都設定 IKE Phase 1 參數,詳細說明請參考這裡。
R1(config)#crypto isakmp policy 10
R1(config-isakmp)#authentication pre-share
然後分別在 R1、R2 和 R3 設定 Phase 2 參數,詳細說明請參考這裡。
R1(config)#crypto ipsec transform-set TS esp-3des esp-sha-hmac
R1(cfg-crypto-trans)#exit
然後設定 Pre-share Key,留意目標 address 是 Physical Interface 的 address,而不是 Tunnel Interface 的 address。
R1(config)#crypto isakmp key ccie address 10.0.24.2
R1(config)#crypto isakmp key ccie address 10.0.34.3
R2(config)#crypto isakmp key ccie address 10.0.12.1
R2(config)#crypto isakmp key ccie address 10.0.34.3
R3(config)#crypto isakmp key ccie address 10.0.12.1
R3(config)#crypto isakmp key ccie address 10.0.24.2
跟著,分別在 R1、R2 和 R3 定義 IPSec Profile。
R1(config)#crypto ipsec profile PF
R1(ipsec-profile)#set transform-set TS
最後在所有 Tunnel 都設定使用 IPSec Profile。
R1(config)#interface tunnel 12
R1(config-if)#tunnel protection ipsec PRofile PF
總結
雖然 Fully Mesh Topology 讓 Spoke Site 之間可以直接連線,但問題在於需要建立的 Tunnel 數量太多。數學告訴我們,點對點數量等於 n(n-1)/2,即是說如果我們有 20 個 Site,Tunnel 數量將會是 190,設定和維護這些 Tunnel 將會是一場惡夢。因此,如果 Spoke Site 數量多的話,還是建議使用 mGRE (或稱 DMVPN) 會比較方便。
相關主題
Jan Ho 2017-07-02
Posted In: 虛擬私人網路 VPN
發佈留言