目錄
前言
Network Address Translation (NAT) 的出現是為了解決 IPv4 Address 不足的問題。話說互聯網絡發展迅速,IPv4 Address 需求量超出預期 (詳情請參考 IPv4 的文章),NAT 是當時發展出來的一個過渡性方案,以解燃眉之急。透過 Public IP Address 與 Private IP Address 之間的轉換,NAT 有效地降低了企業對 Public IP Address 的需求,因而被廣泛使用。本文將會介紹幾款能在 Router 上應用的 NAT 設定。
基本概念
首先介紹一些 NAT 的基本概念。
Inside 與 Outside
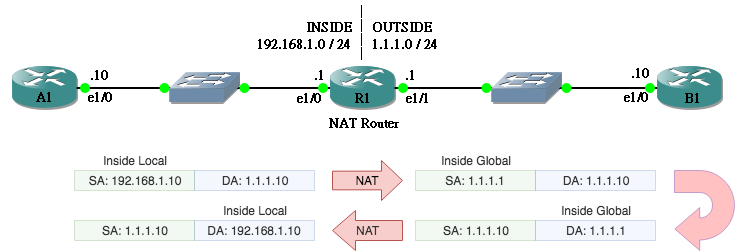
NAT 通常被應用於企業的 Edge Router 上,即 Router 上一邊是連接著 Internet,稱為 Outside,另一邊則連著企業的內聯網,稱為 Inside。以下圖的網絡為例,假設 R1 是執行 NAT 的 Router,A1 是位於 Inside 的 Host,而 B1 是位於 Outside 的 Host。在 R1 上使用 Public Address 那邊為 Outside (e1/1),相反,使用 Private Address 的一邊為 Inside (e1/0)。

設定 Outside 和 Inside 的指令如下:
R1(config)#int ethernet 1/0
R1(config-if)#ip nat inside
R1(config-if)#int eth 1/1
R1(config-if)#ip nat outside
Local 與 Global Address
NAT 的用途是 IP Address 的轉換,因此我們為 IP Address 轉換前和後都定義一個名稱來分辨,分別昰 Local 和 Global。如果 Host 的物理位置在 Inside 那邊,那麽它轉換前的 Address 就是 Inside Local,這個 Address 經過 NAT 轉換後就會變成 Inside Global,留意轉換的只是 Local 和 Global,它的物理位置 Inside 和 Outside 不會變動。文字上較難理解,以下我們用一個例子去說明。假設從 A1 192.168.1.10 經 R1 Ping B1 1.1.1.10,轉換過程如下:
| # | 事件 | Source Address (SA) | Destination Address (DA) |
|---|---|---|---|
| 1 | ICMP Ping 從 A1 出發 | 192.168.1.10 (Inside Local) | 1.1.1.10 (Outside Global) |
| 2 | ICMP Ping 到達 R1,SA 被轉換, 然後送達 B1 |
1.1.1.1 (Inside Global) | 1.1.1.10 (Outside Global) |
| 3 | B1 收到 SA=1.1.1.1 的 ICMP Ping, 因而發 ICMP Reply 到 1.1.1.1 |
1.1.1.10 (Outside Global) | 1.1.1.1 (Inside Global) |
| 4 | R1 收到 ICMP Reply,DA 被轉換, 然後送達 A1 |
1.1.1.10 (Outside Global) | 192.168.1.10 (Inside Local) |
以圖像表示則如下圖:
NAT 與 Routing 的先後次序
關於 NAT 一個極重要的概念就是:究竟 Router 會先做 NAT 還是先做 Routing Decision?這問題必需搞清楚是因為當 Packet 的 IP Address 被轉換時會影響 Router 查找 Route Table 的結果。答案是如果 Packet 從 Inside 進入 Router,會先做 Routing,然後做 NAT。相反,如果 Packet 從 Outside 進入則先做 NAT 才做 Routing。
Inside Source Translation
終於來第一個 NAT 範例:Inside Source Translation。這是十分常用的設定,透過 NAT 把 Private Address 轉換成 Public Address 使內聯 Host 能夠與 Internet 溝通。從下圖所見,當 A1 發 Packet 給 B1 時,Inside Loacal Address 192.168.1.10 經過 NAT 被轉換成 Inside Global Address 1.1.1.1。
Static Translation
現為 R1 做 NAT 設定,由於被轉換的是 Inside Source Address,我們會用到 ip nat inside source static 指令。至於指令是先輸入 Inside Local 還是 Inside Global?筆者也覺難記,不要緊,一直打問號看提示便可以了。
R1(config)#ip nat inside source static ?
  A.B.C.D  Inside local IP address
  esp      IPSec-ESP (Tunnel mode) support
  network  Subnet translation
  tcp      Transmission Control Protocol
  udp      User Datagram Protocol

R1(config)#ip nat inside source static 192.168.1.10 ?
  A.B.C.D    Inside global IP address
  interface  Specify interface for global address

R1(config)#ip nat inside source static 192.168.1.10 1.1.1.1
然後用 show ip nat translation 指令確認一下。
R1#show ip nat translations
Pro Inside global      Inside local       Outside local      Outside global
--- 1.1.1.1            192.168.1.10       ---                ---
這種用 Static 設定的方法也稱為 One to One NAT,需要手動輸入每組 Inside Local 所對應的 Inside Global。由 A1 所發的 Packet 的 Source Address 192.168.1.10 經過 NAT 變成 1.1.1.1,B1 收到時便會以為 Packet 是由 1.1.1.1 送來的,所以回覆時就會把 Destination Address 設為 1.1.1.1,問題來了,我們需要設定 NAT 把 1.1.1.1 轉回 192.168.1.10 嗎?答案是不用的,因為當 NAT 執行時,會把轉換過的 Protocol、IP Address 和 Port 等資料記錄下來,收到回覆時就會自動把 Packet 的 Destination Address 換回原本的 Inside Local Address。
R1#show ip nat translations
Pro Inside global      Inside local       Outside local      Outside global
icmp 1.1.1.1:8         192.168.1.10:8     1.1.1.10:8         1.1.1.10:8
tcp 1.1.1.1:31925      192.168.1.10:31925 1.1.1.10:23        1.1.1.10:23
--- 1.1.1.1            192.168.1.10       ---                ---
Dynamic Translation
如果 Inside 那邊有超過一台 Host,我們就要為每台 Host 分別建立 One to One NAT,較方便的方法是用 Dynamic 的方式來建立,讓 Router 把 Public IP 自動分配給多於一台 Host。舉例,現在為剛才的網絡加一台 Host A2,並於 R1 的 Outside (e1/1) 加上 Secondary IP Address 1.1.1.2。

R1(config)#int ethernet 1/1
R1(config-if)#ip address 1.1.1.2 255.255.255.0 secondary
然後,今次在 ip nat source 指令裡不用 static,改為用 list,下面例子的意思是把所有符合 ACL 1 的 Traffic 的 Inside Local Address 換成 IN-SRC-POOL,而這個 IN-SRC-POOL 被定義為 1.1.1.1 至 1.1.1.2 之間的所有 IP。注意 Pool 的 IP Address 不應少於想要轉換的 Inside Local Address 數量。
R1(config)#ip nat inside source list 1 pool IN-SRC-POOL
R1(config)#access-list 1 permit 192.168.1.0 0.0.0.255
R1(config)#ip nat pool IN-SRC-POOL 1.1.1.1 1.1.1.2 prefix-length 24
完成設定後,起初是沒有任何 Translation 紀錄的。
R1#show ip nat translations
R1#
當有合資格的 Traffic 經過時,Translation 就自動產生了。
R1#show ip nat translations
Pro Inside global      Inside local       Outside local      Outside global
icmp 1.1.1.1:11        192.168.1.10:11    1.1.1.10:11        1.1.1.10:11
tcp 1.1.1.1:44372      192.168.1.10:44372 1.1.1.10:23        1.1.1.10:23
--- 1.1.1.1            192.168.1.10       ---                ---
icmp 1.1.1.2:5         192.168.1.20:5     1.1.1.10:5         1.1.1.10:5
--- 1.1.1.2            192.168.1.20       ---                ---
如果此時 Inside 出現第 3 台 Host 想要做 NAT 的話,轉換不會成功並出現以下錯誤訊息,因 Inside Global Address 不夠用了。
R1#
*Sep 17 23:42:38.677: %IPNAT-4-ADDR_ALLOC_FAILURE: Address allocation failed for 192.168.1.10, pool IN-SRC-POOL might be exhausted
PAT (Port Address Translation)
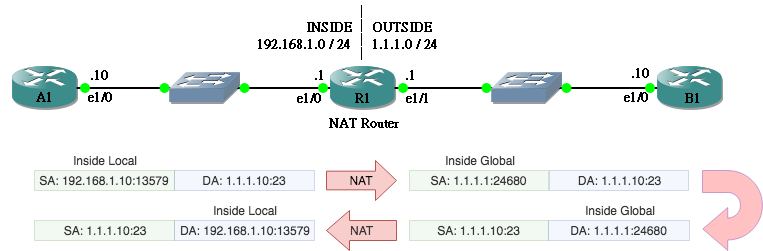
但我們總不能為內聯所有 Host 都準備一組 Public IP Address,這是無法減少 Public IP Address 使用數量的。用 Port Address Translation (PAT) 可以解決這個問題,也是現時最常使用的設定。PAT 又稱為 Overload,原理是在轉換時把 Source Port 和 Destination Port 也一併加進去,由於 TCP Port 的上限是 65,535,所以理論上一個 Public IP Address 就能最多為 65,535 條 Traffic Flow 服務了 (實際上並沒那麽多,因 Router 會保留一些 Port 給自己使用)。例如:A1 想要 Telnet B1 (TCP Port 23),IP Address 及 Port 轉換如下圖。
設定上只要加一個 keyword overload 便可以了。
R1(config)#ip nat inside source list 1 pool IN-SRC-POOL overload
R1(config)#access-list 1 permit 192.168.1.0 0.0.0.255
R1(config)#ip nat pool IN-SRC-POOL 1.1.1.1 1.1.1.1 prefix-length 24
再看看 show ip nat translatios 結果。
R1#show ip nat translations
Pro Inside global      Inside local       Outside local      Outside global
tcp 1.1.1.1:4096       192.168.1.10:27642 1.1.1.10:23        1.1.1.10:23
tcp 1.1.1.1:4097       192.168.1.20:27418 1.1.1.10:23        1.1.1.10:23
Inside Destination Translation
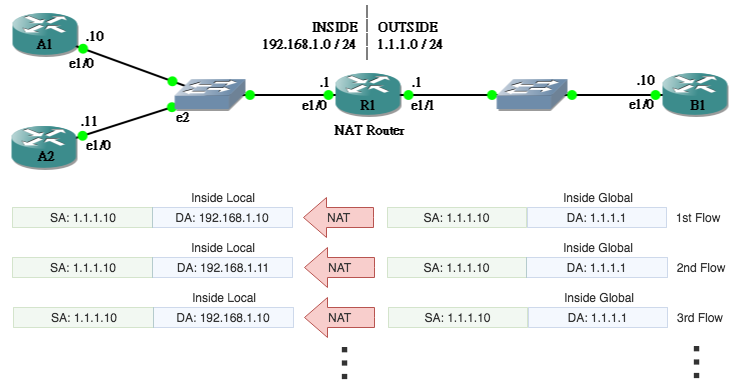
另一個較常用的設定是 Inside Destination Translation,這是一個讓 Router 充當成 Load Balancer 的設定,假設 Host 從 Outside 連到 Public IP Address 1.1.1.1,NAT Router 可把 Inside Global Address 1.1.1.1 轉換成多於 1 個 Inside Local Address,把 Traffic 平均分配到不同的 Host。
R1(config-if)#ip nat inside destination list 1 pool IN-DST-POOL
R1(config-if)#access-list 1 permit 1.1.1.1
R1(config-if)#ip nat pool IN-DST-POOL 192.168.1.10 192.168.1.11 prefix-length 24 type rotary
留意 type rotary 的意思是輪流使用 192.168.1.10 和 192.168.1.11 成為 Inside Local,如在 B1 Telnet 1.1.1.1,會發現 A1 和 A2 輪流回應。
B1#telnet 1.1.1.1
Trying 1.1.1.1 ... Open

User Access Verification

Password:
A1>exit

[Connection to 1.1.1.1 closed by foreign host]
B1#telnet 1.1.1.1
Trying 1.1.1.1 ... Open

User Access Verification

Password:
A2>exit

[Connection to 1.1.1.1 closed by foreign host]
在 R1 查看 NAT Table 則看到同一 Inside Global 被轉換至不同的 Inside Local。
R1#show ip nat translations
Pro Inside global      Inside local       Outside local      Outside global
tcp 1.1.1.1:23         192.168.1.10:23    1.1.1.10:57226     1.1.1.10:57226
tcp 1.1.1.1:23         192.168.1.11:23    1.1.1.10:32916     1.1.1.10:32916
相關主題
Jan Ho 2018-09-17
Posted In: 網絡服務 Services
發佈留言