目錄
前言
Routing Information Protocol (RIP) 是屬於 Distance Vector 的 Routing Protocol,設定簡單,適合初學者輕鬆體驗 Routing 的樂趣 : ),RIP 有 Version 1 及 Version 2 兩個 Version,Version 1 已過時,考試都不考了,所以本篇文章只會集中於 Version 2 的設定。
Network 指令
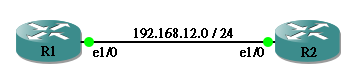
現在使用以下網絡學習 RIP 的設定,RIP 設定非常簡單,不外乎一個 Network 指令。

hostname R1
!
interface Ethernet0/0
 ip address 192.168.12.1 255.255.255.0
!
router rip
 version 2
 network 192.168.12.0
hostname R2
!
interface Ethernet0/0
 ip address 192.168.12.2 255.255.255.0
!
interface Ethernet0/1
 ip address 192.168.23.2 255.255.255.0
!
router rip
 version 2
 network 192.168.12.0
 network 192.168.23.0
hostname R3
!
interface Ethernet0/0
 ip address 192.168.23.3 255.255.255.0
!
router rip
 version 2
 network 192.168.23.0
Network 指令是用來宣告那個網絡會參與 RIP,所謂參與,就表示該網絡所在的 Interface 要發放 RIP 封包,封包內包括了該 Router 參與的網絡資訊。舉例:R1 屬於 192.168.12.0 網絡的 Interface 會參與發放 RIP 封包,即 Eth0/0 會發放 RIP 封包,RIP 封包裡面有什麼?就是告訴 R2 知道從 R1 這裡可以到達 192.168.12.0 這個網絡。至於 Version 2 則是把 RIP 設定為 Version 2,預設是 Version 1 ,所以如果不用這個指令,RIP 便會使用 Version 1。
Unicast 與 Broadcast
使用 Network 指令後 RIP 會用 Multicast Address 224.0.0.9 來交換 Route 資訊,如果網絡不支緩 Multicast 的話,可以改用 Unicast 傳送。方法是加入 Neighbor 指令並輸入對方的 Unicast IP Address。舉例:
R1#sh run | s rip
router rip
 version 2
 network 192.168.12.0
 neighbor 192.168.12.2
R2#sh run | s rip
router rip
 version 2
 network 192.168.12.0
 neighbor 192.168.12.1
相反,RIP 也支緩 Broadcast 傳播,只要在 Interface 下指令 ip rip v2-broadcast 便可以。(只支緩 Version 2)
 R1(config)#interface Ethernet1/0
 R1(config-if)#ip rip v2-broadcast
 R2(config)#interface Ethernet1/0
 R1(config-if)#ip rip v2-broadcast
Passive Interface
在實際環境中,並不是所有 Router 都需要參與 RIP,如果我們知道相鄰的 Router 不參與 RIP,就不用發出 RIP 封包了。以下面的網絡為例,R3 只想在 10.0.23.0 / 24 執行 RIP,而不想在 10.0.34.0 / 24 執行。

由於使用 network 10.0.0.0 會讓兩個 Interface 都被執行 RIP,所以我們要加一道 passive-interface <interface> 指令讓 Ethernet0/1 不執行 RIP。
hostname R3
!
router rip
 version 2
 passive-interface Ethernet0/1
 network 10.0.0.0
另一個方法是先讓所有 Interface passive,然後再 no 掉要執行的 Interface。
hostname R3
!
router rip
 version 2
 passive-interface default
 no passive-interface Ethernet0/0
 network 10.0.0.0
Authentication
RIP 支援密碼認證,傳送 Routing 更新時可以檢查密碼,兩隻 Router 密碼相同才可進行 Routing 交換。設密碼有兩個步驟,首先在兩隻 Router 分別設定 Key Chain。
R1(config)# key chain MyChain
R1(config-keychain)# key 1
R1(config-keychain-key)# key-string MyPassword
R2(config)# key chain MyChain
R2(config-keychain)# key 1
R2(config-keychain-key)# key-string MyPassword
第二步是在 Interface 設定 Key Chain 和 encryption 方法,可選 Text 或 MD5,當然用 MD5 較安全。
R1(config)# interface ethernet 0/0
R1(config-if)# ip rip authentication key-chain MyChain
R1(config-if)# ip rip authentication mode md5
R2(config)# interface ethernet 0/1
R2(config-if)# ip rip authentication key-chain MyChain
R2(config-if)# ip rip authentication mode md5
Metric
RIP 的 Metric 是很單純地用 Hop Count 來計算的,Hop Count 即是要跳過多少個 Hop 才到達目的地,Hop Count 最大為 15,16 或以上會被視為 Unreachable (無法到達)。用以下網絡作解說。
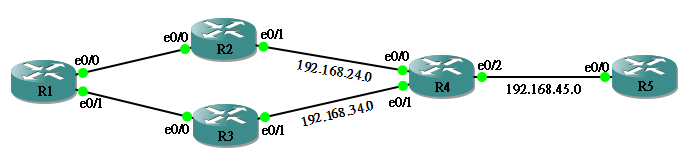
在 R1 看看 Route Table,由 R1 到 192.168.24.0 / 24 要經過 1 Hop,所以 Metric 為 1。由 R1 到 192.168.34.0 / 24 也經過 1 Hop,所以 Metric 也是 1。而 R1 到達 192.168.45.0 / 24,則要經過 2 Hop,因此 Metric 是 2。值得一提的是,到達 192.168.45.0 / 24 由於有兩條 Metric 相同的路徑,所以會進行 Load Balance,要到目的地的 Packet 會 Round Robin 地派送到 R2 和 R3。
R1#show ip route | begin Gateway
Gateway of last resort is not set

C    192.168.12.0/24 is directly connected, Ethernet0/0
C    192.168.13.0/24 is directly connected, Ethernet0/1
R    192.168.45.0/24 [120/2] via 192.168.13.3, 00:00:19, Ethernet0/1
                     [120/2] via 192.168.12.2, 00:00:16, Ethernet0/0
R    192.168.24.0/24 [120/1] via 192.168.12.2, 00:00:16, Ethernet0/0
R    192.168.34.0/24 [120/1] via 192.168.13.3, 00:00:19, Ethernet0/1
由於 RIP 的 Metric 並非由 Bandwidth 計算出來,因此不能藉由更改 Bandwidth 來改變 Metric。這時就要使用 Offset 來進行手動修改 Metric。假設我們修改由 R4 把它宣告的 192.168.45.0 / 24 這條 Route 的 Metric。
第一步是要寫一條 Acess List,必需使用 Standard Access List (1-99)。
R4(config)#access-list 1 permit 192.168.45.0
然後在 Router RIP 之下設定 offset,整句指令的意思是:把附合 access list 1 而離開 R4 宣告給其他 Router 的 Route,宣告時把 Metrc 增加 5。
R4(config-router)#offset-list 1 out 5
於是在 R2 和 R3 應該看到 Metric 由原本的 1 變成 6 了。
R2#show ip route | begin Gateway
Gateway of last resort is not set

C    192.168.12.0/24 is directly connected, Ethernet0/0
R    192.168.13.0/24 [120/1] via 192.168.12.1, 00:00:11, Ethernet0/0
R    192.168.45.0/24 [120/6] via 192.168.24.4, 00:00:12, Ethernet0/1
C    192.168.24.0/24 is directly connected, Ethernet0/1
R    192.168.34.0/24 [120/1] via 192.168.24.4, 00:00:12, Ethernet0/1
而在 R1 看 192.168.45.0/24 的 Metric 則變成 7。
R1#show ip route | begin Gateway
Gateway of last resort is not set

C    192.168.12.0/24 is directly connected, Ethernet0/0
C    192.168.13.0/24 is directly connected, Ethernet0/1
R    192.168.45.0/24 [120/7] via 192.168.13.3, 00:00:19, Ethernet0/1
                     [120/7] via 192.168.12.2, 00:00:16, Ethernet0/0
R    192.168.24.0/24 [120/1] via 192.168.12.2, 00:00:16, Ethernet0/0
R    192.168.34.0/24 [120/1] via 192.168.13.3, 00:00:19, Ethernet0/1
Timer
RIP 一共有 4 個 Timer,分別是 Update Timer、Invalid Timer、Hold-down Timer 及 Flush Timer。
Update Timer
這個比較簡單,就是 Router 隔多久才傳送一次 Route Update,預設是 30 秒。
Invalid Timer
當過了 3 分鐘 (Invalid Timer) 都沒有再收到某條 Route 的更新,Router 就會把該條 Route 變成 Invalid 狀態,Route 的 Metric 變成 16,並且繼續向其他 Router 發放,這樣做是因為它希望其他 Router 都知道這條 Route 出了問題。Invalid Timer 預設是 180 秒。
Hold-down Timer
如出現以下三個情況其中之一,RIP 會把一條 Route 設成 Hold-down 狀態:
- Invalid Timer 倒數到 0
- 收到其他 Router 宣告這條 Route 的 Metric 是 16 (無法到達)
- 這條 Route 的 Metric 變大了
進入 Hold-down 狀態的 Route 不會再接受任何更新,這是希望 Route 進入一個「冷靜」的狀態,不希望 Route 的 Metric 不斷被改變,增加穩定性。Hold-down Timer 預設為 180 秒。
Flush Timer
當沒有再收到某條 Route 的更新,Flush Timer 便會開始倒數。當 Flush Timer 倒數至 0,這條 Route 就會被移除,Flush Timer 預設為 240 秒。留意 Flush Timer 是和 Invalid Timer 同時開始倒數的,即是說當 Invalid Timer 倒數至 0 秒,Flush Timer 就倒數至 60 秒,再過 60 秒,這條 Route 才會被移除。
如果想更改 RIP 的 Timer,可以用 timers basic <update> <invalid> <hold-down> <flush> 指令。
R1(config)# router rip
R1(config-router)# timers basic 10 60 60 80
如果真的要更改 Timer,請確保每一隻 Router 的 Timer 都相同,否則會造成不穩定的問題。
Summarization
隨著網絡規模不斷增加,Route 的數目亦會不斷增加, Summarization 可把 Route 組合,以減少 Route 的數量,從而減低消耗 Router 的 CPU、記憶體及頻寬。用以下網絡為例,先把全部 Router 的 auto-summary 關掉:
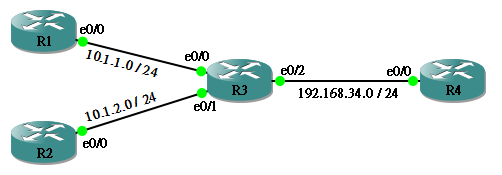
觀察 R4 的 Route Table,R3 把 10.1.1.0 和 10.1.2.0 兩個網段分別傳給 R4,因此 R4 的 Route Table 中有兩條不同的 Route。
R4#show ip route | begin Gateway
Gateway of last resort is not set

     10.0.0.0/24 is subnetted, 2 subnets
R       10.1.2.0 [120/1] via 192.168.34.3, 00:00:14, Ethernet0/0
R       10.1.1.0 [120/1] via 192.168.34.3, 00:00:14, Ethernet0/0
C    192.168.34.0/24 is directly connected, Ethernet0/0
然後我們嘗試在 R3 的 Interface Ethernet 0/2 下一個 Summary 指令。
R3(config-if)#ip summary-address rip 10.1.0.0 255.255.0.0
再到 R4 看看 Route Table,發現多了一條 Summary Route 10.1.0.0/16,至於原本的 10.1.1.0/24 和 10.1.2.0/24 就要等待 Flush Timer 數完才會被移除。
R4#show ip route | begin Gateway
Gateway of last resort is not set

     10.0.0.0/8 is variably subnetted, 3 subnets, 2 masks
R       10.1.2.0/24 [120/1] via 192.168.34.3, 00:01:24, Ethernet0/0
R       10.1.1.0/24 [120/1] via 192.168.34.3, 00:01:24, Ethernet0/0
R       10.1.0.0/16 [120/1] via 192.168.34.3, 00:00:27, Ethernet0/0
C    192.168.34.0/24 is directly connected, Ethernet0/0
那麽 Auto-summary 又跟剛才的 Summary 指令有什麼分別呢?試試看。
R3(config-if)#no ip summary-address rip 10.1.0.0 255.255.0.0
R3(config-if)#router rip
R3(config-router)#auto-summary
原來 Auto-summary 會使用預設的 Subnet Mask,Class A IP 就用 /8、Class B IP 就用 /16,而 Class C 就會用 /24,所以在 R4 會多了一條 10.0.0.0/8,至於 /16 那條亦要等到 Flush Timer 數完才會被移除。
R4#show ip route | begin Gateway
Gateway of last resort is not set

     10.0.0.0/8 is variably subnetted, 2 subnets, 2 masks
R       10.0.0.0/8 [120/1] via 192.168.34.3, 00:00:09, Ethernet0/0
R       10.1.0.0/16 [120/1] via 192.168.34.3, 00:00:38, Ethernet0/0
C    192.168.34.0/24 is directly connected, Ethernet0/0
Default-information Originate
Router 可以透過 RIP 發佈 Default Route,用以下網絡為例子,假設 R2 想發佈 Default Route 給 R1 及 R3,只需使用以下指令。

R2(config)#router rip
R2(config-router)#default-information originate
然後,在 R1 和 R3 已經可以看到 default route 了。
R1#show ip route rip
Codes: L - local, C - connected, S - static, R - RIP, M - mobile, B - BGP
       D - EIGRP, EX - EIGRP external, O - OSPF, IA - OSPF inter area
       N1 - OSPF NSSA external type 1, N2 - OSPF NSSA external type 2
       E1 - OSPF external type 1, E2 - OSPF external type 2
       i - IS-IS, su - IS-IS summary, L1 - IS-IS level-1, L2 - IS-IS level-2
       ia - IS-IS inter area, * - candidate default, U - per-user static route
       o - ODR, P - periodic downloaded static route, H - NHRP, l - LISP
       + - replicated route, % - next hop override

Gateway of last resort is 192.168.12.2 to network 0.0.0.0

R*    0.0.0.0/0 [120/1] via 192.168.12.2, 00:00:09, Ethernet1/0
R     192.168.23.0/24 [120/1] via 192.168.12.2, 00:00:09, Ethernet1/0
R3#show ip route rip
Codes: L - local, C - connected, S - static, R - RIP, M - mobile, B - BGP
       D - EIGRP, EX - EIGRP external, O - OSPF, IA - OSPF inter area
       N1 - OSPF NSSA external type 1, N2 - OSPF NSSA external type 2
       E1 - OSPF external type 1, E2 - OSPF external type 2
       i - IS-IS, su - IS-IS summary, L1 - IS-IS level-1, L2 - IS-IS level-2
       ia - IS-IS inter area, * - candidate default, U - per-user static route
       o - ODR, P - periodic downloaded static route, H - NHRP, l - LISP
       + - replicated route, % - next hop override

Gateway of last resort is 192.168.23.2 to network 0.0.0.0

R*    0.0.0.0/0 [120/1] via 192.168.23.2, 00:00:02, Ethernet1/0
      1.0.0.0/32 is subnetted, 1 subnets
R        1.1.1.1 [120/2] via 192.168.23.2, 00:00:02, Ethernet1/0
R     192.168.12.0/24 [120/1] via 192.168.23.2, 00:00:02, Ethernet1/0
但如果我們想 RIP 只在某些 Interface 發佈 Default Route 而非全部,可以在指令後面加上 Route Map,例如 R2 只向 e1/1 發 Default Route,指令如下:
R2(config-router)#default-information originate route-map TO_R3_ONLY
R2(config-router)#exit
R2(config)#route-map TO_R3_ONLY
R2(config-route-map)#set interface ethernet 1/1
再做一個進階設定,R2 現時收到 R1 傳來的 1.1.1.1/32 (R1 的 Loopback0),現在想 R2 在收到這條 Route 才發佈 Default Route,否則不發佈,可以在剛才的 Route Map 加入以下設定:
R2(config)#route-map TO_R3_ONLY
R2(config-route-map)#match ip address prefix-list CHECKING
R2(config)#ip prefix-list CHECKING permit 1.1.1.1/32
測試一下,如果在 R1 把 Loopback0 關掉,R2 的 1.1.1.1/32 就消失了。
R1(config)#int loopback0
R1(config-if)#shutdown
R2#show ip route rip
Codes: L - local, C - connected, S - static, R - RIP, M - mobile, B - BGP
       D - EIGRP, EX - EIGRP external, O - OSPF, IA - OSPF inter area
       N1 - OSPF NSSA external type 1, N2 - OSPF NSSA external type 2
       E1 - OSPF external type 1, E2 - OSPF external type 2
       i - IS-IS, su - IS-IS summary, L1 - IS-IS level-1, L2 - IS-IS level-2
       ia - IS-IS inter area, * - candidate default, U - per-user static route
       o - ODR, P - periodic downloaded static route, H - NHRP, l - LISP
       + - replicated route, % - next hop override

Gateway of last resort is not set

R2#
現在 R2 不會發佈 Default Route 到 R3。
R3#show ip route rip
Codes: L - local, C - connected, S - static, R - RIP, M - mobile, B - BGP
       D - EIGRP, EX - EIGRP external, O - OSPF, IA - OSPF inter area
       N1 - OSPF NSSA external type 1, N2 - OSPF NSSA external type 2
       E1 - OSPF external type 1, E2 - OSPF external type 2
       i - IS-IS, su - IS-IS summary, L1 - IS-IS level-1, L2 - IS-IS level-2
       ia - IS-IS inter area, * - candidate default, U - per-user static route
       o - ODR, P - periodic downloaded static route, H - NHRP, l - LISP
       + - replicated route, % - next hop override

Gateway of last resort is not set

R     192.168.12.0/24 [120/1] via 192.168.23.2, 00:00:12, Ethernet1/0
Route Filtering
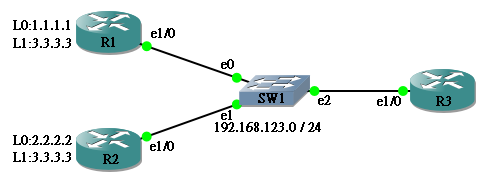
Route Filtering 的意思是限制 RIP Router 只發佈某些 Route,也可控制接收方選擇接受那些 Route。而設定方式主要有 Distribute-list、Distance 和 Offset-list 3 種。先設定好以下網絡,R1、R2 和 R3 透過 192.168.123.0/24 來收發 RIP,R1 和 R2 會把 L0 和 L1 發佈出去。
Distribute-list
先在 Global Configure Mode 設定 Standard Access List、Extended Access List 或 Prefix List,然後放進 RIP 的 Distribute-list 便可做到 Route Filtering。先用 Standard Access List 做例子,在 R1 禁止發佈 1.1.1.1/32 的設定如下。
R1(config)#router rip
R1(config-router)#distribute-list FILTER_STD out
R1(config-router)#exit
R1(config)#ip access-list standard FILTER_STD
R1(config-std-nacl)#deny 1.1.1.1
R1(config-std-nacl)#permit any
等待 1.1.1.1/32 在 R3 被 flush 後,R3 便不會再見到 1.1.1.1/32 這條 Route 了。
R3#show ip route rip
Codes: L - local, C - connected, S - static, R - RIP, M - mobile, B - BGP
       D - EIGRP, EX - EIGRP external, O - OSPF, IA - OSPF inter area
       N1 - OSPF NSSA external type 1, N2 - OSPF NSSA external type 2
       E1 - OSPF external type 1, E2 - OSPF external type 2
       i - IS-IS, su - IS-IS summary, L1 - IS-IS level-1, L2 - IS-IS level-2
       ia - IS-IS inter area, * - candidate default, U - per-user static route
       o - ODR, P - periodic downloaded static route, H - NHRP, l - LISP
       + - replicated route, % - next hop override

Gateway of last resort is not set

      2.0.0.0/32 is subnetted, 1 subnets
R        2.2.2.2 [120/1] via 192.168.123.2, 00:00:11, Ethernet1/0
      3.0.0.0/32 is subnetted, 1 subnets
R        3.3.3.3 [120/1] via 192.168.123.2, 00:00:11, Ethernet1/0
                 [120/1] via 192.168.123.1, 00:00:11, Ethernet1/0
如果使用 Extended Access List 的話,可以把 Route Source 加進去,做一些較仔細的設定。例如,R3 現在不接受來自 R2 (192.168.123.2) 的 3.3.3.3/32,但來自 R1 的 3.3.3.3/32 則保留。設定如下。
R3(config)#access-list 100 deny ip host 192.168.123.2 host 3.3.3.3
R3(config)#access-list 100 permit ip any any
R3(config)#router rip
R3(config-router)#distribute-list 100 in
待 Flush Timer 數完,來自 R2 的 3.3.3.3/32 消失了,只剩下來自 R1 的 3.3.3.3/32。
R3#show ip ro rip
Codes: L - local, C - connected, S - static, R - RIP, M - mobile, B - BGP
       D - EIGRP, EX - EIGRP external, O - OSPF, IA - OSPF inter area
       N1 - OSPF NSSA external type 1, N2 - OSPF NSSA external type 2
       E1 - OSPF external type 1, E2 - OSPF external type 2
       i - IS-IS, su - IS-IS summary, L1 - IS-IS level-1, L2 - IS-IS level-2
       ia - IS-IS inter area, * - candidate default, U - per-user static route
       o - ODR, P - periodic downloaded static route, H - NHRP, l - LISP
       + - replicated route, % - next hop override

Gateway of last resort is not set

      2.0.0.0/32 is subnetted, 1 subnets
R        2.2.2.2 [120/1] via 192.168.123.2, 00:00:14, Ethernet1/0
      3.0.0.0/32 is subnetted, 1 subnets
R        3.3.3.3 [120/1] via 192.168.123.2, 00:02:33, Ethernet1/0
                 [120/1] via 192.168.123.1, 00:00:03, Ethernet1/0
如果用 Prefix List,做法相若,例如想把 3.3.3.3/32 擋掉,Prefix List 設定如下。留意 0.0.0.0/0 le 32 代表所有網絡,即 Access List 裡的 any)。
R3(config)#ip prefix-list FILTER seq 5 deny 3.3.3.3/32
R3(config)#ip prefix-list FILTER seq 10 permit 0.0.0.0/0 le 32
Administrative Distance
由於 Router 並不會把 Administrative Distance 等於 255 的 Route 加進 Route Table,我們可以利用這特性,把某些 Route 的 AD 設成 255 從而達成 Filtering 效果。現在試把從 R2 來的 2.2.2.2/32 的 AD 設成 255。
R3(config)#ip access-list standard DIST_255
R3(config-std-nacl)#permit 2.2.2.2
R3(config-std-nacl)#exit
R3(config)#router rip
R3(config-router)#distance 255 192.168.123.2 0.0.0.0 DIST_255
Offset-list
最後一個方法是 Offset-list,上面提過,RIP 的 Metric (Hop Count) 如果是 16 或以上會被視為 Unreachable,所以只要在 Offset-list 把某 Route 的 Metric 設為 16,也可做到 Filtering 效果。Offset-list 設定在上面提過了,不在此重覆。
相關主題
Jan Ho 2014-08-01
Posted In: Layer 3 網絡技術
發佈留言