目錄
前言
Cisco 的 Group Encrypted Transport VPN (GETVPN) 技术可以简化 IPSec 设定,让网管人员更容易管理和配置 IPSec。为了建立 Fully Mesh IPSec 网络,每只 Router 都要对其馀所有 Router 建立 IPSec Tunnel,涉及大量的 ISAKMP Key 管理及 IPSec 组态。试计算一下,如网络里有 n 只 Router 之间需要 IPSec 保护,IPSec Tunnel 总数为 n(n-1)/2,设定极为费时及容易出错,网管人员生活大打折扣 😭 。本文将会介绍 GETVPN 的原理和设定,假设读者已对 IPSec 理论有所了解。
GETVPN 原理
传统 IPSec 设定需要在每只 Router 设定 IPSec 参数,包括 Interesting Traffic 和 Encryption Policy 等等,GETVPN 化繁为简的方法是先定义一只 Key Server (KS),然後把 IPSec Policy 都设定在 KS 之中。其他 Router (又称为 Group Member,或 GM) 用 GDOI (Group Domain of Interpretation) Protocol 向 KS 认证并取得 Policy 设定,然後建立单一 IPSec Tunnel 与其他 GM 沟通。
本文将用以下网络作例子来设定 GETVPN,R4 是 KS,R1 与 R2 分别是 GM1 和 GM2。
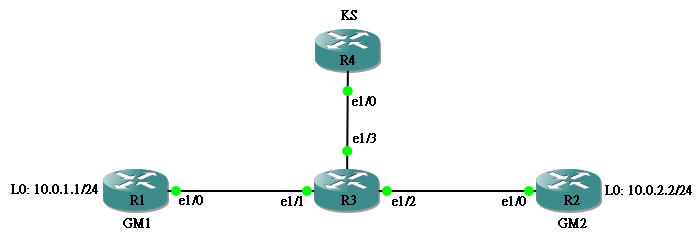
Router 以 EIGRP 打通,原设定如下:
hostname R3
!
interface Ethernet1/1
 ip address 192.168.13.3 255.255.255.0
!
interface Ethernet1/2
 ip address 192.168.23.3 255.255.255.0
!
interface Ethernet1/3
 ip address 192.168.34.3 255.255.255.0
!
router eigrp 1
 network 0.0.0.0
R1丶R2 及 R4 设定相若,以下只显示 R1 设定:
hostname R1
!
interface Loopback0
 ip address 10.0.1.1 255.255.255.0
!
interface Ethernet1/0
 ip address 192.168.13.1 255.255.255.0
 duplex full
!
router eigrp 1
 network 0.0.0.0
Key Server 设定
Step 1:设定 Interesting Traffic
跟一般 IPSec 相同,先设定 Interesting Traffic 去定义想要建立 IPSec 的 Network,此例子所有 VPN Network 均为 10.0.x.x,因此使用以下 ACL:
KS(config)#ip access-list extended VPN-Traffic
KS(config-ext-nacl)#permit ip 10.0.0.0 0.0.255.255 10.0.0.0 0.0.255.255
Step 2:设定 IKE Phase 1 和 Phase 2 参数
参数的意思已在 IPSec 的文章中解释过,不在此重复说明。
R4(config)#crypto isakmp policy 1
R4(config-isakmp)#encryption aes
R4(config-isakmp)#hash md5
R4(config-isakmp)#authentication pre-share
R4(config-isakmp)#group 2
R4(config)#crypto ipsec transform-set TS esp-aes esp-sha-hmac
理论上,我们可以对不同的 GM 使用不同的 Key,这里为方便,一律使用 ccie 这个 Key,因此 Address 设为 0.0.0.0,即所有 Address。
R4(config)#crypto isakmp key ccie address 0.0.0.0
Step 4:定义 Crypto Map
这部份最复杂,先定义 Profile。
R4(config)#crypto ipsec profile PROFILE-IPSEC
R4(ipsec-profile)#set transform-set TS
KS 会定期产生 Encryption Key 派给 GM,并用 Asymmetric Encryption 加密,因此,我们要先为 KS 产生出 Private and Public Key Pair。
R4(config)#crypto key generate rsa label KEYPAIR modulus 1024
然後设定 GDOI:
R4(config)#crypto gdoi group GROUP_GDOI
R4(config-gdoi-group)#identity number 1234  1️⃣
R4(config-gdoi-group)#server local
R4(gdoi-local-server)#rekey authentication mypubkey rsa KEYPAIR  2️⃣
R4(gdoi-local-server)#rekey transport unicast  3️⃣
R4(gdoi-local-server)#sa ipsec 10
R4(gdoi-local-server)#address ipv4 192.168.34.4  4️⃣
R4(gdoi-sa-ipsec)#profile PROFILE-IPSEC
R4(gdoi-sa-ipsec)#match address ipv4 VPN-Traffic  5️⃣
1️⃣ 使用同一组 GDOI 的 GM 需使用与 KS 相同的 Identity Number
2️⃣ 用此组 Asymmetric Key Pair 去产生 Encryption Key 派给 GM
3️⃣ 用 unicast 派发
4️⃣ KS 用来接收 GDOI Request 的 IP Address
5️⃣ 设定什麽 Traffic 会推动 IPSec 流程,此 Policy 会下载到每只 GM
定义 Crypto Map,然後把 Crypto Map 放进 Interface。
R4(config)#crypto map CMAP 10 gdoi
% NOTE: This new crypto map will remain disabled until a valid
        group has been configured.
R4(config-crypto-map)#set group GROUP_GDOI
R4(config)#int ethernet 1/0
R4(config-if)#crypto map CMAP
Group Member 设定
基本上,所有 GM 都使用相同的设定。
Step 1:设定 IKE Phase 1
GM 必先与 KS 建立 ISAKMP,才能获取 Policy 资讯,所以 IKE Phase 1 设定不能幸免。
R1(config)#crypto isakmp policy 1
R1(config-isakmp)#encryption aes
R1(config-isakmp)#hash md5
R1(config-isakmp)#authentication pre-share
R1(config-isakmp)#group 2
并需设定 Pre-share Key。
R1(config)#crypto isakmp key ccie address 192.168.34.4
Step 2:设定 GDOI
设定 GDOI Group,如刚才所说 Identity Number 要相同,Server Address 则是 KS 的 Address。
R1(config)#crypto gdoi group GROUP_GDOI
R1(config-gdoi-group)#identity number 1234
R1(config-gdoi-group)#server address ipv4 192.168.34.4
Step 3:定义 Crypto Map
定义 Crypto Map,然後把 Crypto Map 放进 Interface。
R1(config)#crypto map CMAP 10 gdoi
% NOTE: This new crypto map will remain disabled until a valid
        group has been configured.
R1(config-crypto-map)# set group GROUP_GDOI
R1(config)#int ethernet 1/0
R1(config-if)#crypto map CMAP
如果设定没问题的话,该可以看见此 GM 向 KS 进行 Registration。
*Oct 27 19:09:14.663: %CRYPTO-5-GM_REGSTER: Start registration to KS 192.168.34.4 for group GROUP_GDOI using address 192.168.13.1
R1(config-if)#
*Oct 27 19:09:14.671: %CRYPTO-6-GDOI_ON_OFF: GDOI is ON
也可看到 ISAKMP 建立。
R1#show crypto isakmp sa
IPv4 Crypto ISAKMP SA
dst             src             state          conn-id status
192.168.34.4    192.168.23.2    GDOI_IDLE         1001 ACTIVE
192.168.23.2    192.168.34.4    GDOI_REKEY        1002 ACTIVE
在 R2 使用相同的 GM 设定,然後从 R1 的 Loopback0 Ping R2 的 Loopback0 (产生 Interesting Traffic),IPSec Tunnel 便出现了。
R1#ping 10.0.2.2 source 10.0.1.1
Type escape sequence to abort.
Sending 5, 100-byte ICMP Echos to 10.0.2.2, timeout is 2 seconds:
Packet sent with a source address of 10.0.1.1
!!!!!
Success rate is 100 percent (5/5), round-trip min/avg/max = 16/27/52 ms
R1#
R1#show crypto ipsec sa

interface: Ethernet1/0
    Crypto map tag: CMAP, local addr 192.168.13.1

   protected vrf: (none)
   local  ident (addr/mask/prot/port): (10.0.0.0/255.255.0.0/0/0)
   remote ident (addr/mask/prot/port): (10.0.0.0/255.255.0.0/0/0)
   current_peer 0.0.0.0 port 848
     PERMIT, flags={}
    #pkts encaps: 5, #pkts encrypt: 5, #pkts digest: 5
    #pkts decaps: 5, #pkts decrypt: 5, #pkts verify: 5
    #pkts compressed: 0, #pkts decompressed: 0
    #pkts not compressed: 0, #pkts compr. failed: 0
    #pkts not decompressed: 0, #pkts decompress failed: 0
    #send errors 0, #recv errors 0

     local crypto endpt.: 192.168.13.1, remote crypto endpt.: 0.0.0.0
     path mtu 1500, ip mtu 1500, ip mtu idb Ethernet1/0
     current outbound spi: 0x0(0)
     PFS (Y/N): N, DH group: none

     inbound esp sas:

     inbound ah sas:

     inbound pcp sas:

     outbound esp sas:

     outbound ah sas:

     outbound pcp sas:

     local crypto endpt.: 192.168.13.1, remote crypto endpt.: 0.0.0.0
     path mtu 1500, ip mtu 1500, ip mtu idb Ethernet1/0
     current outbound spi: 0x9300630A(2466276106)
     PFS (Y/N): N, DH group: none

     inbound esp sas:
      spi: 0x9300630A(2466276106)
        transform: esp-aes esp-sha-hmac ,
        in use settings ={Tunnel, }
        conn id: 1, flow_id: 1, sibling_flags 80000040, crypto map: CMAP
        sa timing: remaining key lifetime (sec): (3235)
        Kilobyte Volume Rekey has been disabled
        IV size: 16 bytes
        replay detection support: N
        Status: ACTIVE(ACTIVE)

     inbound ah sas:

     inbound pcp sas:

     outbound esp sas:
      spi: 0x9300630A(2466276106)
        transform: esp-aes esp-sha-hmac ,
        in use settings ={Tunnel, }
        conn id: 2, flow_id: 2, sibling_flags 80000040, crypto map: CMAP
        sa timing: remaining key lifetime (sec): (3235)
        Kilobyte Volume Rekey has been disabled
        IV size: 16 bytes
        replay detection support: N
        Status: ACTIVE(ACTIVE)

     outbound ah sas:

     outbound pcp sas:
GETVPN 与 DMVPN 之比较
由於 GETVPN 与 DMVPN 都有着简化 Remote Site 设定的效果,在应用上 GETVPN 比 DMVPN 在以下优胜之处:
- 基於 GETVPN 使用 Tunnel Mode with Address Preservation,即原 IP Header (Inner IP Header) 被复制到 Outer IP Header,因此 VPN Network 可直接被 Routing 而不像 DMVPN 那样需要在 VPN 之上另外建立一层 Overlay Routing Protocol。
- DMVPN 把 Multicast Traffic 复制到不同的 mGRE Tunnel,籍此支援 Multicast,而 GETVPN 可直接使用 Underlay 的 Multicast Protocol,例如:PIM。
相關主題
Jan Ho 2021-07-22
Posted In: 虚拟私人网路 VPN
发表回复