目錄
前言
Switch 的 Qos 理论跟 Router 相若,仍涉及 Classification丶Marking丶Queuing 及 Congestion Avoidance 等题目,但在设定上却比较复杂,必需先从 Switch 的结构开始探讨,才能准确理解每一道设定指令。阅读本文章前,建议读者先了解:QoS on Router丶Bandwidth Management 及 Virtual LAN 等文章。
Switch 的结构
如图所示,用 QoS 的角度去理解一只 Switch,可简单分成 4 个部份:
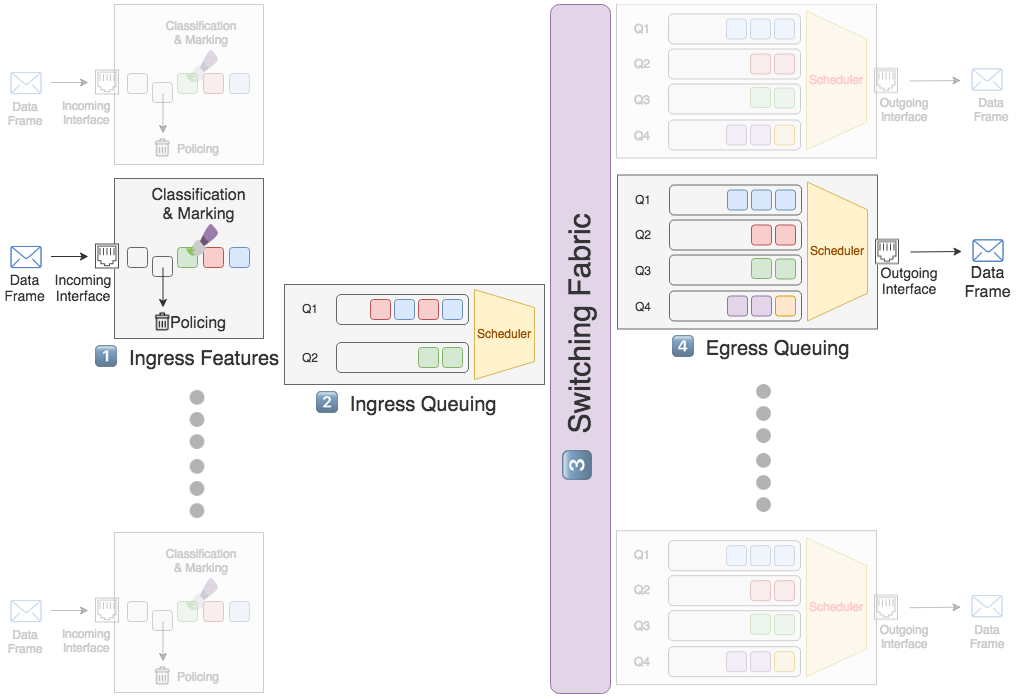
1. Ingress Features
当 Data Frame 进入 Switch 的 Interface 後,会进行 Classification 及 Marking,也可同时做 Policing,关於这 3 个 Features 的详细理论,请参考 QoS on Router 及 Bandwidth Management 教学。但需要留意在 Router 即 Layer 3 层面,IP Packet 利用 Header 里的 IPP 或 DSCP 来判断 Packet「重要性」,来到 Layer 2 Switch 的 Data Frame Header 里有多一个选择,就是 CoS (Class of Service)。CoS 是放在 802.1q tag 里的一组 3 Bits 长度的标签,结构跟 IPP 很相似,由 0 至 7 代表 Data Frame 的重要性。只有 802.1q Trunk 才能支缓 CoS,关於 802.1q 的教学文件请看这里。
2. Ingress Queuing
一般低至中阶的 Switch 只有两条 Ingress Queue 给所有 Interface 共用,Data Frame 会跟据设定被送到这两条 Queue 等待被送出。Router 所使用的 Scheduler 是 WRR (Weighted Round Robin),而 Switch 用的是 SRR (Shared Round Robin),玩法有点不同,稍後说明。
3. Switching Fabric
Data Frame 被送上 Switching Fabric,并以非常高的速度被送到它要去的 Outgoing Interface 之 Egress Queue,至於 Switching Fabric 的奥秘可留给电子工程师研究,作为网络工程师不用深究。
4. Egress Queuing
低至中阶的 Switch 每个 Interface 有 4 条 Egress Queue,Data Frame 会跟据设定被安排在 Queue 中等待被送上 Outgoing Interface 然後送走。
启动 QoS
Switch 的 QoS 预设是关闭的。
SW#show mls qos
QoS is disabled
QoS ip packet dscp rewrite is enabled
用 mls qos 指令去开启 QoS 功能。
SW(config)#mls qos
SW(config)#end
SW#show mls qos
QoS is enabled
QoS ip packet dscp rewrite is enabled
Ingress
把 Switch 结构分成两部份去看,Switching Fabric 左边为 Ingress 部份,而右边则为 Egress。先集中看看 Ingress 的部份,当 Data Frame 从 Interface 进来後,可以先应用以下一些 Ingress Features。
Classification & Marking
我们可以用 MQC 指令 (只能应用在 Ingress),即 class-map 与 policy-map 做 Classifcation 及 Marking,在 QoS on Router 的文章已解释过了,不在此重覆。由於 Switch 接驳着 End User 的设备,由它们传来的 Data Frame 有机会已被写上 CoS丶IPP 或 DSCP,Switch 可以选择是否相信 (Trust) 这些 Marking,如不相信则可覆写 (Override) 其 Marking。
SW#show mls qos interface fastEthernet 1/0/13
FastEthernet1/0/13
trust state: not trusted
trust mode: not trusted
trust enabled flag: ena
COS override: dis
default COS: 0
DSCP Mutation Map: Default DSCP Mutation Map
Trust device: none
qos mode: port-based
原设定为 Not Trust,即 CoS 预设归 0。使用指令 mls qos trust cos。
SW(config)#interface fa 1/0/13
SW(config-if)#mls qos trust cos
SW(config-if)#end
SW#
SW#show mls qos interface fastEthernet 1/0/13
FastEthernet1/0/13
trust state: trust cos
trust mode: trust cos
trust enabled flag: ena
COS override: dis
default COS: 0
DSCP Mutation Map: Default DSCP Mutation Map
Trust device: none
qos mode: port-based
更进阶的设定为只相信 Cisco IP Phone 传来的 CoS,使用指令 mls qos trust device cisco-phone 後,如对方并非 Cisco IP Phone,则 trust state 会变成 not trusted。
SW(config-if)#mls qos trust device cisco-phone
SW(config-if)#end
SW#show mls qos interface fastEthernet 1/0/13
FastEthernet1/0/13
trust state: not trusted
trust mode: trust cos
trust enabled flag: dis
COS override: dis
default COS: 0
DSCP Mutation Map: Default DSCP Mutation Map
Trust device: cisco-phone
qos mode: port-based
在非 802.1q Trunk 的情况下 (如 Access Port 或 Route Port),当然应使用 trust dscp 或 ip-precedence 啦。
SW(config-if)#mls qos trust dscp
SW(config-if)#end
SW#show mls qos interface fastEthernet 1/0/13
FastEthernet1/0/13
trust state: trust dscp
trust mode: trust dscp
trust enabled flag: ena
COS override: dis
default COS: 0
DSCP Mutation Map: Default DSCP Mutation Map
Trust device: none
qos mode: port-based
default COS 0 的意思是没有提供 CoS 值则归 0,可用 mls qos cos 更改。如选择不相信 User 的设备,可另加 mls qos cos override 把全部 data frame 的 CoS 换掉。
SW(config-if)#mls qos cos 5
SW(config-if)#mls qos cos override
SW(config-if)#end
SW#show mls qos interface fastEthernet 1/0/13
FastEthernet1/0/13
trust state: not trusted
trust mode: not trusted
trust enabled flag: ena
COS override: ena
default COS: 5
DSCP Mutation Map: Default DSCP Mutation Map
Trust device: none
qos mode: port-based
为了让 CoS 与 DSCP (或 IPP) 一致,决定了 Data Frame 的 CoS 值後,Switch 会根据 CoS-DSCP Table 去更改 IP Packet 里的 DSCP 值。我们可用 show mls qos maps cos-dscp 查看这个 Table。因此,CoS 0 时 DSCP 就被设为 0,CoS 1 时 DSCP 被设为 8,如此类推。
SW#show mls qos maps cos-dscp
   Cos-dscp map:
        cos:   0  1  2  3  4  5  6  7
     --------------------------------
       dscp:   0  8 16 24 32 40 48 56
此设定有问题的地方是:IP Phone 一般把 CoS 设为 5,而 Voice Traffic 我们希望其 DSCP 为 46 (EF),因此可以把 CoS-DSCP Table 修改一下。
SW(config)#mls qos map cos-dscp 0 8 16 24 32 46 48 56
SW(config)#end
SW#show mls qos maps cos-dscp
   Cos-dscp map:
        cos:   0  1  2  3  4  5  6  7
     --------------------------------
       dscp:   0  8 16 24 32 46 48 56
同样道理,如果 Trust DSCP 的话,Switch 也会根据 DSCP-CoS Table 把 CoS 修改。
SW#show mls qos maps dscp-cos
   Dscp-cos map:
     d1 :  d2 0  1  2  3  4  5  6  7  8  9
     ---------------------------------------
      0 :    00 00 00 00 00 00 00 00 01 01
      1 :    01 01 01 01 01 01 02 02 02 02
      2 :    02 02 02 02 03 03 03 03 03 03
      3 :    03 03 04 04 04 04 04 04 04 04
      4 :    05 05 05 05 05 05 05 05 06 06
      5 :    06 06 06 06 06 06 07 07 07 07
      6 :    07 07 07 07
Policing
我们可以透过 MQC 设定 Policing,由於在 Bandwidth Management 的文章中已详细介绍过 Policing 的理论及设定,不在此重覆。
SW(config)#policy-map policy-policing
SW(config-pmap)#class class-default
SW(config-pmap-c)#police 10000000 8000 exceed-action drop
SW(config-pmap-c)#exit
SW(config)#int fastEthernet 1/0/13
SW(config-if)#service-policy input policy-policing
除了绝情地 Drop 掉,也可选择把 DSCP 降低然後传送。
SW(config-pmap-c)#police 10000000 8000 exceed-action policed-dscp-transmit
至於降低多少呢?Switch 是依据 Policed-DSCP Map Table 来控制。
SW#show mls qos maps policed-dscp
   Policed-dscp map:
     d1 :  d2 0  1  2  3  4  5  6  7  8  9
     ---------------------------------------
      0 :    00 01 02 03 04 05 06 07 08 09
      1 :    10 11 12 13 14 15 16 17 18 19
      2 :    20 21 22 23 24 25 26 27 28 29
      3 :    30 31 32 33 34 35 36 37 38 39
      4 :    40 41 42 43 44 45 46 47 48 49
      5 :    50 51 52 53 54 55 56 57 58 59
      6 :    60 61 62 63
上表为预设的 Policed-DSCP Map Table 值,即完全不改变。假设现在我们想把原 DSCP 值 24 降至 14,指令如下。
SW(config)#mls qos map policed-dscp 24 to 14
SW(config)#end
SW#show mls qos maps policed-dscp
   Policed-dscp map:
     d1 :  d2 0  1  2  3  4  5  6  7  8  9
     ---------------------------------------
      0 :    00 01 02 03 04 05 06 07 08 09
      1 :    10 11 12 13 14 15 16 17 18 19
      2 :    20 21 22 23 14 25 26 27 28 29
      3 :    30 31 32 33 34 35 36 37 38 39
      4 :    40 41 42 43 44 45 46 47 48 49
      5 :    50 51 52 53 54 55 56 57 58 59
      6 :    60 61 62 63
Queuing
完成 Ingress Features 後,Data Frame 就会进入 Queuing。Switch 会跟据 Cos-inputq-threshold Map 和 Dscp-inputq-threshold Map 把 Frame 放进 Queue 1 (Q1) 或 Queue 2 (Q2)。请先看预设值。
SW#show mls qos maps cos-input-q
   Cos-inputq-threshold map:
              cos:  0   1   2   3   4   5   6   7
              ------------------------------------
  queue-threshold: 1-1 1-1 1-1 1-1 1-1 2-1 1-1 1-1

SW#
SW#show mls qos maps dscp-input-q
   Dscp-inputq-threshold map:
     d1 :d2    0     1     2     3     4     5     6     7     8     9
     ------------------------------------------------------------
      0 :    01-01 01-01 01-01 01-01 01-01 01-01 01-01 01-01 01-01 01-01
      1 :    01-01 01-01 01-01 01-01 01-01 01-01 01-01 01-01 01-01 01-01
      2 :    01-01 01-01 01-01 01-01 01-01 01-01 01-01 01-01 01-01 01-01
      3 :    01-01 01-01 01-01 01-01 01-01 01-01 01-01 01-01 01-01 01-01
      4 :    02-01 02-01 02-01 02-01 02-01 02-01 02-01 02-01 01-01 01-01
      5 :    01-01 01-01 01-01 01-01 01-01 01-01 01-01 01-01 01-01 01-01
      6 :    01-01 01-01 01-01 01-01
暂时只需看 hyphen – 前面的数字,举例:CoS 5 会被放进 Q2,DSCP 24 会被放进 Queue 1。更改方法如下:
例如把 CoS 6 和 7 都放进 Q2。
SW(config)#mls qos srr-queue input cos-map queue 2 6 7
SW(config)#end
SW#show mls qos maps cos-input-q
   Cos-inputq-threshold map:
              cos:  0   1   2   3   4   5   6   7
              ------------------------------------
  queue-threshold: 1-1 1-1 1-1 1-1 1-1 2-1 2-1 2-1
把 DSCP 50 至 54 都放进 Q2。
SW(config)#mls qos srr-queue input dscp-map queue 2 50 51 52 53 54
SW(config)#end
SW#show mls qos maps dscp-input-q
   Dscp-inputq-threshold map:
     d1 :d2    0     1     2     3     4     5     6     7     8     9
     ------------------------------------------------------------
      0 :    01-01 01-01 01-01 01-01 01-01 01-01 01-01 01-01 01-01 01-01
      1 :    01-01 01-01 01-01 01-01 01-01 01-01 01-01 01-01 01-01 01-01
      2 :    01-01 01-01 01-01 01-01 01-01 01-01 01-01 01-01 01-01 01-01
      3 :    01-01 01-01 01-01 01-01 01-01 01-01 01-01 01-01 01-01 01-01
      4 :    02-01 02-01 02-01 02-01 02-01 02-01 02-01 02-01 01-01 01-01
      5 :    02-01 02-01 02-01 02-01 02-01 01-01 01-01 01-01 01-01 01-01
      6 :    01-01 01-01 01-01 01-01
问题是我们为什麽要大费周章地把 Frame 分门别类放进两条 Queue 呢?因为两条 Queue 所得的资源 (Buffer) 不同,简单来说两条 Queue 的长度不同,我们都知道 Queue 排满了便会发生 Tail Drop。因此,Queue 的资源分配可以影响 Frame 的传送速度及成功率。用 show mls qos input-queue 可查看 Buffer 原设定值。
SW#show mls qos input-queue
Queue     :       1       2
----------------------------------------------
buffers   :      90      10
bandwidth :       4       4
priority  :       0      10
threshold1:     100     100
threshold2:     100     100
以上可见,Queue 1 预设得到 90% Buffer,而 Queue 2 预设得到 10% Buffer。那麽 Buffer 的总数究竟是多少呢?各款型号不同,这要看看产品的 Datasheet 了,但并不重要。以下指令可更改百份比。
SW(config)#mls qos srr-queue input buffers 80 20
SW(config)#end
SW#show mls qos input-queue
Queue     :       1       2
----------------------------------------------
buffers   :      80      20
bandwidth :       4       4
priority  :       0      10
threshold1:     100     100
threshold2:     100     100
Scheduler
Frame 在 Q1 和 Q2 排队,等待被 Scheduler 送上 Switching Fabric。话说 Switch 预设把 Q2 设为 Priority Queue (PQ),被放在 Q2 的 Frame 会被优先处理。按照预设值来看,Scheduler 预设会分配 10% Bandwidth 给 PQ。例如:Switching Fabric 每秒能处理 10G 流量,就会把 1G 配给 PQ,剩馀的 9G 则按 4:4 的比例分给 Q1 和 Q2,即每条 Queue 4.5G。然而,以上这些分配都只会在 Congestion (壅塞) 发生时生效,平时这 10G 都是可共用的,又称为 Share Mode。但需留意任何情况下 PQ 都有权先行,因此我们通常会把 Voice Traffic 放到 PQ,例如 CoS 5 和 DSCP 46。Bandwidth 分配是可设定的,方法如下。
SW(config)#mls qos srr-queue input priority-queue 2 bandwidth 20
SW(config)#mls qos srr-queue input bandwidth 40 60
SW(config)#end
SW#show mls qos input-queue
Queue     :       1       2
----------------------------------------------
buffers   :      80      20
bandwidth :      40      60
priority  :       0      20
threshold1:     100     100
threshold2:     100     100
假设 Switching Fabric 有 10G Bandwidth,透过以上设定 Scheduler 把 2G 先分配给 PQ (Q2),剩馀 8G 的 40% 即 3.2G 分配给 Q1,另外 60% 即 4.8G 则分配给 Q2。留意以上分配只在 Congestion 发生时作出才有效,如没有 Congestion 时,10G Bandwidth 会招待所有 Queue。最後介绍一下,如有需要我们可以把 PQ 关掉,方法是把 PQ 的 Bandwidth 设成 0 便可。
SW(config)#mls qos srr-queue input priority-queue 2 bandwidth 0
SW(config)#end
SW#show mls qos input-queue
Queue     :       1       2
----------------------------------------------
buffers   :      90      10
bandwidth :      40      60
priority  :       0       0
threshold1:     100     100
threshold2:     100     100
Weighted Tail Drop
Queue 满溢时才开始 Tail Drop 是不好的,较理想的方法是按 CoS 或 DSCP 把不重要的 Data Frame 提早 Drop 掉,保留空间给较重要的 Frame,称为 Weighted Tail Drop (WTD)。每条 Queue 有 3 个 Threshold 值,即 Threshold 1丶Threshold 2 和 Threshold 3,预设值为 100%。可用以下指令更改 Threshold 1 和 Threshold 2,而 Threshold 3 值 100% 则无法更改。
SW(config)#mls qos srr-queue input threshold 1 33 66
SW(config)#mls qos srr-queue input threshold 2 20 50
SW(config)#end
SW#show mls qos input-queue
Queue     :       1       2
----------------------------------------------
buffers   :      90      10
bandwidth :      40      60
priority  :       0       0
threshold1:      33      20
threshold2:      66      50
之前介绍过的 Cos-inputq-threshold Map 和 Dscp-inputq-threshold Map 中 Hyphen – 後面的数字就是 Threshold。我们可为不同 CoS 和 DSCP 值的 Frame 设定使用哪组 Threshold。以下例子设定 CoS 3 的 Frame 使用 Threshold 2,CoS 4 则使用 Threshold 3。
SW(config)#mls qos srr-queue input cos-map threshold 2 3
SW(config)#mls qos srr-queue input cos-map threshold 3 4
SW(config)#end
SW#show mls qos maps cos-input-q
   Cos-inputq-threshold map:
              cos:  0   1   2   3   4   5   6   7
              ------------------------------------
  queue-threshold: 1-1 1-1 1-1 1-2 1-3 2-1 2-1 2-1
意思是当 Q1 到达 Threshold 1 即 33% 满时,新来的 Frame 如果是 CoS 0丶1 和 2 就会被 Drop 掉。同样道理,当 Q1 到达 Threshold 2 即 66% 满时,新来的 Frame 如果是 CoS 0丶1丶2 和 3 都会被 Drop 掉。最後,如 Q1 达到 Threshold 3 即 100% 全满,则 CoS 0 至 4 都会被 Drop 掉,CoS 5 至 7 不受影响的原因是它们被安排在 Q2。修改 dscp-map 的 threshold 值指令相若,不再重覆。
Ingress 与 Egress 的差异
现在大家应该了解 Ingress 那边的架构和设定了,再来是探讨一下 Switching Fabric 右边的 Egress。由於 Egress 只有 Queuing 和 Scheduler,我们集中比较一下两者在 Queuing 和 Scheduler 的差别。
- 所有 Incoming Interface 都使用同一组 Ingress Queue 和 Scheduler,但每个 Egress Interface 都使用自己独立的 Queue 和 Scheduler。
- Ingress 只有两条 Queue,而每组 Egress 都有 4 条 Queue。
- Ingress Queue 在 Globally Configuration Mode 设定,而 Egress Queue 则在 Interface Configuration Mode 中设定。
- Ingress Scheduler 只支缓 Share,而 Egress Scheduler 则支缓 Share丶Shape 和 Limit,稍後说明。
- Egress Queue 用 Queue Set 的设定方法,即提供两组设定去应用在不同的 Interface 上,稍後说明。
Egress
Egress 并不提供 Classification丶Marking 及 Policing,因此我们直接跳进 Queuing。跟 Ingress 相似,Data Frame 从 Switching Fabric 出来後会跟据 Cos-outputq-threshold map 和 DSCP-outputq-threshold map 把 Data Frame 安排放入 Q1 至 Q4 之中。由於设定方法跟 Ingress 相似,不再重覆。
SW#show mls qos maps cos-output-q
   Cos-outputq-threshold map:
              cos:  0   1   2   3   4   5   6   7
              ------------------------------------
  queue-threshold: 2-1 2-1 3-1 3-1 4-1 1-1 4-1 4-1

SW#
SW#show mls qos maps dscp-output-q
   Dscp-outputq-threshold map:
     d1 :d2    0     1     2     3     4     5     6     7     8     9
     ------------------------------------------------------------
      0 :    02-01 02-01 02-01 02-01 02-01 02-01 02-01 02-01 02-01 02-01
      1 :    02-01 02-01 02-01 02-01 02-01 02-01 03-01 03-01 03-01 03-01
      2 :    03-01 03-01 03-01 03-01 03-01 03-01 03-01 03-01 03-01 03-01
      3 :    03-01 03-01 04-01 04-01 04-01 04-01 04-01 04-01 04-01 04-01
      4 :    01-01 01-01 01-01 01-01 01-01 01-01 01-01 01-01 04-01 04-01
      5 :    04-01 04-01 04-01 04-01 04-01 04-01 04-01 04-01 04-01 04-01
      6 :    04-01 04-01 04-01 04-01
Queue Set
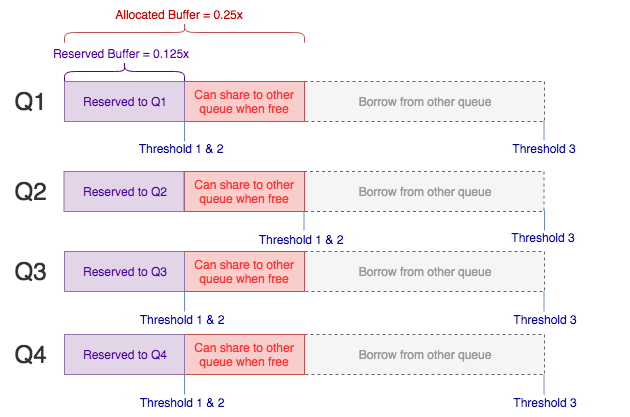
跟 Ingress Queue 不同,每一个 Egress Interface 都拥有自己的 Queue Buffer,如要分别为每一个 Interface 进行设定太辛苦了!因此有了 Queue Set 的概念,先把 Queue Set 设定好 (最多只可设两组 Queue Set),然後把 Queue Set 应用在 Interface 上。以下为两组 Queue Set 的预设值。
SW#show mls qos queue-set 1
Queueset: 1
Queue     :       1       2       3       4
----------------------------------------------
buffers   :      25      25      25      25
threshold1:     100     200     100     100
threshold2:     100     200     100     100
reserved  :      50      50      50      50
maximum   :     400     400     400     400

SW#
SW#show mls qos queue-set 2
Queueset: 2
Queue     :       1       2       3       4
----------------------------------------------
buffers   :      25      25      25      25
threshold1:     100     200     100     100
threshold2:     100     200     100     100
reserved  :      50      50      50      50
maximum   :     400     400     400     400
以 Queue Set 1 为例子,假设 Interface 上的 Buffer 总量为 x,每条 Queue 便会得到 (25%x) 的 Buffer,称为 Allocated Buffer。而在这 (25%x) 的 Allocated Buffer 之中保留 (reserved) 了 50% 即 (12.5%x) 的 Buffer,称为 Reserved Buffer,是保证留给该 Queue 使用的,而剩馀的 (12.5%x) 则可在空闲时借给其他 Queue 使用。至於 Threshold 1丶Threshold 2 和 Maximum 则是 Weighted Tail Drop 设定,以 Q1 为例,Threshold 1 和 Threshold 2 的设定是 Reserved Buffer 的 100%,即是 12.5%x,而 Threshold 3 则等於 Reserved Buffer 的 400% 即 50%x。只看数字超复杂的,请看下图:
Cisco 文献声称,预设 Queue Set 已适合大部份网络环境,不用更改。如坚持更改,可用以下指令。
SW(config)#mls qos queue-set output 1 buffers 30 30 20 20
SW(config)#mls qos queue-set output 1 threshold 1 200 400 75 800
SW(config)#end
SW#show mls qos queue-set 1
Queueset: 1
Queue     :       1       2       3       4
----------------------------------------------
buffers   :      30      30      20      20
threshold1:     200     200     100     100
threshold2:     400     200     100     100
reserved  :      75      50      50      50
maximum   :     800     400     400     400
Switch 预设把 Queue Set 1 应用到所有 Interface。
SW#show mls qos interface fastEthernet 1/0/13 queueing
FastEthernet1/0/13
Egress Priority Queue : disabled
Shaped queue weights (absolute) :  10 20 30 40
Shared queue weights  :  25 25 25 25
The port bandwidth limit : 100  (Operational Bandwidth:100.0)
The port is mapped to qset : 1
如需更改可使用以下指令。
SW(config-if)#queue-set 2
SW(config-if)#end
SW#show mls qos interface fastEthernet 1/0/13 queueing
FastEthernet1/0/13
Egress Priority Queue : disabled
Shaped queue weights (absolute) :  10 20 30 40
Shared queue weights  :  25 25 25 25
The port bandwidth limit : 100  (Operational Bandwidth:100.0)
The port is mapped to qset : 2
至於 Cos-outputq-threshold map 和 DSCP-outputq-threshold map 的 Threshold 设定,跟 Ingress 相似,不再重覆。
Ingress Scheduler 把 Frame 送上 Switching Fabric 只支缓 Share,当我们为 Queue 设定好 Bandwidth 比例後,只有在 Congestion 发生时才会按比例配置 Bandwidth。Egress Scheduler 把 Frame 送上 Outgoing Interface 一样支缓 Share。不同的是 Egress Scheduler 是按每一个 Interface 独立设定的,指令如下:
SW(config-if)#srr-queue bandwidth share 1 1 2 3
SW(config-if)#end
SW#show mls qos interface fastEthernet 1/0/13 queueing
FastEthernet1/0/13
Egress Priority Queue : disabled
Shaped queue weights (absolute) :  10 20 30 40
Shared queue weights  :  1 1 2 3
The port bandwidth limit : 100  (Operational Bandwidth:100.0)
The port is mapped to qset : 2
於是,Scheduler 会按 1:1:2:3 的比例把 Outgoing Interface 的 Bandwidth 分配给 Queue 1丶2丶3 和 4。
Egress Scheduler 额外支缓 Shape,当一条 Queue 加了 Shape 设定代表其分配到的 Bandwidth 设了上限,无论有没有 Congestion 发生也不能超过这上限。
SW(config-if)#srr-queue bandwidth shape 10 20 0 0
SW(config-if)#end
SW#show mls qos interface fastEthernet 1/0/13 queueing
FastEthernet1/0/13
Egress Priority Queue : disabled
Shaped queue weights (absolute) :  10 20 0 0
Shared queue weights  :  1 1 2 3
The port bandwidth limit : 100  (Operational Bandwidth:100.0)
The port is mapped to qset : 2
这样设定的意思是,Q1 最多只得到 Outgoing Interface 的 1/10 Bandwidth 即 10%,而 Q2 则最多得到 1/20 即 5%,如设成 0 则表示不设限制。
至於 Limit 则比较简单,只是为 Scheduler 设定其最大传输量,以下例子设 Limit 85 的意思是 Scheduler 只会应用 Outgoing Interface 的 85% Bandwidth。以 FastEthernet (100M) 为例就只用 85M。
SW(config-if)#srr-queue bandwidth limit 85
SW(config-if)#end
SW#show mls qos interface fastEthernet 1/0/13 queueing
FastEthernet1/0/13
Egress Priority Queue : disabled
Shaped queue weights (absolute) :  10 20 0 0
Shared queue weights  :  1 1 2 3
The port bandwidth limit : 85  (Operational Bandwidth:85.05)
The port is mapped to qset : 2
Priority Queue
Egress 也可设 Priority Queue,但必需为 Q1 不能选其他。把 Q1 设成 PQ 後,Scheduler 总是先处理 Q1,直至 Q1 被清空才处理其他 Queue。
SW(config-if)#priority-queue out
SW(config-if)#end
SW#show mls qos interface fastEthernet 1/0/13 queueing
FastEthernet1/0/13
Egress Priority Queue : enabled
Shaped queue weights (absolute) :  10 20 0 0
Shared queue weights  :  1 1 2 3
The port bandwidth limit : 85  (Operational Bandwidth:85.05)
The port is mapped to qset : 2
相關主題
Jan Ho 2021-07-22
Posted In: menu-tall-2-zh-hans, 网络服务 Services
发表回复