前言
NetFlow 让网管人员可以收集 Packet 的 Header 资讯,从而分析网络的状况,包括网络流量的类型及使用量等。收集和分析这些数据对网络的监控及持续发展有极大帮助,本文以 Router 上的设定为主,即关於 Packet Header 收集的设定,并未包含使用软件分析数据的教学。
基本原理
NetFlow 基本分为 Exporter 和 Collector 两个角色,Exporter 即负责收集 Packet Header 资讯的设备,通常是 Router。Router 会在 Interface 上收集丶整合和筛选 Packet Header,然後传送至 Collector。Collector 则可以是普通 Windows 或 Linux Server,也可以是专门用作收集的 Appliance丶VM 等,在 Server 上安装了软体便可以把数据作分析丶绘图及产生一些老板最爱看的流量报告之类,较具名气的品牌有 Solarwind,如果预算较紧也有 Opensource 的选择,例如 NfSen。
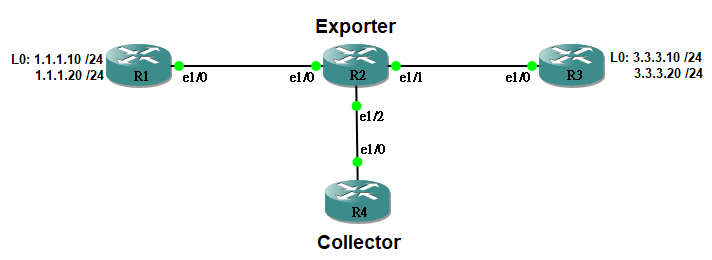
以上图为例子,我们想用 R2 收集 R1 和 R3 之间的流量。假设 R4 是一台 Collector,其 e1/0 的 IP Address 为 192.168.24.4。我们可用以下指令把 R2 设定成 Exporter:
R2(config)#ip flow-export version 9
R2(config)#ip flow-export destination 192.168.24.4 2055
然後在 Interface e1/0 启动 NetFlow。
R2(config)#interface Ethernet1/0
R2(config-if)#ip flow ingress
R2(config-if)#ip flow egress
Version 可选 1丶5 或 9,v1 太旧,一般不用。v5 和 v9 的分别是,v5 送出来的 NetFlow 资讯包中,每笔资料的栏名 (Field Name) 都是预设不可改,而 v9 的栏名则比较 Dynamic,由 NetFlow Template 去定义,所以比较有弹性,Exporter 会定期送一份 NetFlow Template 给 Collector 说明每个栏位的意思。如果 NetFlow Collector 支缓 v9 的话,就选 v9 吧。2055 是 NetFlow 惯用的 UDP Port,也可自行选择其他 Port,当然 Collector 的接收 Port 设定要相同。完成设定後可以跑 Wireshark Capture R2 的 e1/2 ,然後在 R1 产生一些 Traffic 去 R3 例如 Ping,就会看到 Exporter 把 Traffic Flow 的资讯传给 Collector。
Wireshark 会捕捉到类似以下这些资讯。

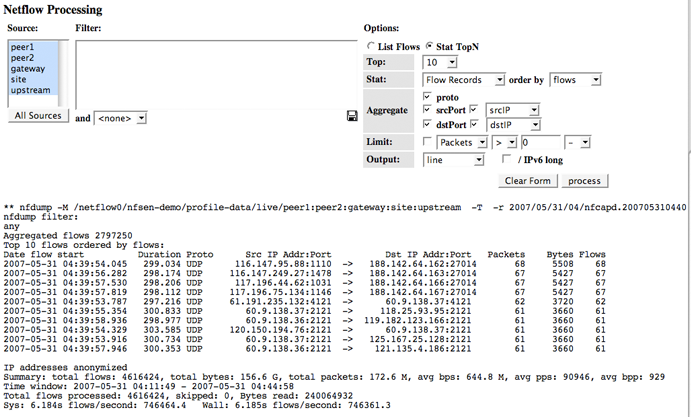
然後在 Collector 上 (例如:NfSen),大概会看到类似下图的 Traffic Flow 资讯。
Flow Cache
但流经 Router 的 Packet 成千上万,Router 如何判断那些 Packet 是同一条 Flow?其实 Router 会基於 Packet Header 里面的 7 个值来判断,如果全部相同则判断为同一条 Flow。
- Ingress Interface
- Source IP
- Destination IP
- IP Protocol Number
- TCP 或 UDP Source Port
- TCP 或 UDP Destination Port
- IP Type of Service (ToS)
所以 Router 会把收集到的 Packet Header 资讯贮在自己的 Flow Cache 中,并作出统计,到「时机到了」才把资讯传给 Collector。用指令 show ip cache flow 可以看到这些资讯。
R2#show ip cache flow
IP packet size distribution (3861 total packets):
   1-32   64   96  128  160  192  224  256  288  320  352  384  416  448  480
   .000 .221 .001 .259 .000 .000 .000 .000 .000 .000 .000 .000 .000 .000 .000

    512  544  576 1024 1536 2048 2560 3072 3584 4096 4608
   .000 .000 .000 .517 .000 .000 .000 .000 .000 .000 .000

IP Flow Switching Cache, 4456704 bytes
  3 active, 65533 inactive, 9 added
  1623 ager polls, 0 flow alloc failures
  Active flows timeout in 30 minutes
  Inactive flows timeout in 15 seconds
IP Sub Flow Cache, 533256 bytes
  3 active, 16381 inactive, 9 added, 9 added to flow
  0 alloc failures, 0 force free
  1 chunk, 1 chunk added
  last clearing of statistics never
Protocol         Total    Flows   Packets Bytes  Packets Active(Sec) Idle(Sec)
--------         Flows     /Sec     /Flow  /Pkt     /Sec     /Flow     /Flow
TCP-Telnet           2      0.0         8    45      0.0       2.1       1.0
ICMP                 3      0.0       999   700      2.0      25.9      15.5
IP-other             1      0.0         3    40      0.0       5.0      15.1

SrcIf         SrcIPaddress    DstIf         DstIPaddress    Pr SrcP DstP  Pkts
Total:               6      0.0       502   695      2.0      14.5      10.6

SrcIf         SrcIPaddress     DstIf         DstIPaddress     Pr SrcP DstP  Pkts
Et1/1         3.3.3.10         Et1/0*        1.1.1.10         01 0000 0000   265
Et1/0         1.1.1.10         Et1/1         3.3.3.30         01 0000 0800   265
何时才是所谓的「时机到了」?看 Active Flow Timeout 和 Inactive Flow Timeout。即是说,一些还在传输的 Flow,Router 会每隔 30 分钟才更新 Collector 一次,而已经完成的 Traffic Flow,在完成後 15 秒,Router 就会告知 Collector。更改 Timeout 指令如下,留意时间单位不同。
R2(config)#ip flow-cache timeout active ?
    Timeout in minutes

R2(config)#ip flow-cache timeout inactive ?
    Timeout in seconds

R2(config)#ip flow-cache timeout active 5
R2(config)#ip flow-cache timeout inactive 10
Aggregation
在 Router 把 Flow Cache 的资讯送给 Collector 之前,可以先做 Aggregation 把资料进一步整合。例如,如果我们不需要 Collector 知道 Flow 来自那个独立 Source Address,而只希望 Collector 知道 Flow 来自那个 Network Prefix 便足够了,可以把 Flow 按 Source Prefix 组合起来。
R2(config)#ip flow-aggregation cache source-prefix
R2(config-flow-cache)#export version 9
R2(config-flow-cache)#export destination 192.168.24.4 2055
R2(config-flow-cache)#cache timeout active 5
R2(config-flow-cache)#cache timeout inactive 10
R2(config-flow-cache)#enabled
参数跟上一部份类似,注意要设 enabled 才能把此 Aggregation 生效。然後便可透过 show ip cache flow aggregation source-prefix 指令查看 Aggregation Cache 里面的资讯,格式跟 Cache Flow 类似。
R2#show ip cache flow aggregation source-prefix

IP Flow Switching Cache, 278544 bytes
  2 active, 4094 inactive, 13 added
  191 ager polls, 0 flow alloc failures
  Active flows timeout in 30 minutes
  Inactive flows timeout in 15 seconds
IP Sub Flow Cache, 34056 bytes
  2 active, 1022 inactive, 13 added, 13 added to flow
  0 alloc failures, 0 force free
  1 chunk, 1 chunk added

Src If         Src Prefix      Msk  AS    Flows  Pkts B/Pk  Active
Et1/0          1.1.1.0         /24  0        2   198   100     9.9
Et1/1          3.3.3.0         /24  0        2   198   100     9.9
除了 Source-prefix,还有其他 Aggregation 方法包括:Port丶ToS 等。
R2(config)#ip flow-aggregation cache ?
  as                      AS aggregation
  as-tos                  AS-TOS aggregation
  bgp-nexthop-tos         BGP nexthop TOS aggregation
  destination-prefix      Destination Prefix aggregation
  destination-prefix-tos  Destination Prefix TOS aggregation
  prefix                  Prefix aggregation
  prefix-port             Prefix-port aggregation
  prefix-tos              Prefix-TOS aggregation
  protocol-port           Protocol and port aggregation
  protocol-port-tos       Protocol, port and TOS aggregation
  source-prefix           Source Prefix aggregation
  source-prefix-tos       Source Prefix TOS aggregation
Sampler
如果讯息量极多,处理大量的 Packet Header 会消耗 Router 资源,我们可以设定 Sampler,即不处理所有 Packet Header,只抽查部份 Packet Header 来放进 Flow Cache 之中。例如以下设定在 Interface 上每 50 个 Packet 只随机抽样 1 个放进 Flow Cache。
R2(config)#flow-sampler-map MAP_NETFLOW_SAMPLER
R2(config-sampler)#mode random one-out-of 50
R2(config-sampler)#exit
把原本的 ip flow 设定拿掉,换成 flow-sampler,预设只有 ingress,如想 egress 也做 Sampler 则需多下一条指令指明 egress。
R2(config)#int ethernet 1/0
R2(config-if)#no ip flow egress
R2(config-if)#no ip flow ingress
R2(config-if)#flow-sampler MAP_NETFLOW_SAMPLER
R2(config-if)#flow-sampler MAP_NETFLOW_SAMPLER egress
使用 Sampler 要注意的是 Sampling Rate 越低 (即 one-out-of 参数越大) 则数据失真越严重,Packet 量少的 Traffic Flow 有机会被忽略。另外,Collector 必需设定相同的 Sampling Rate 以便估算实际 Bandwidth 使用量。
Filter
最後,我们还可以用 Filter 决定监察范围,方法是用 Policy Map 决定把那些 Traffic 打进那一个 Sampler。例如:我们只希望监察由 1.1.1.10 到 3.3.3.10 的 Traffic Flow。
R2(config)#ip access-list extended TRAFFIC
R2(config-ext-nacl)#permit ip host 1.1.1.10 host 3.3.3.10
R2(config-ext-nacl)#exit
R2(config)#class-map CLASS_FLOW
R2(config-cmap)#match access-group name TRAFFIC
R2(config-cmap)#exit
R2(config)#policy-map POLICY_NETFLOW_FILTER
R2(config-pmap)#class CLASS_FLOW
R2(config-pmap-c)#netflow-sampler MAP_NETFLOW_SAMPLER
在 Interface 上把原有的 Sampler 拿掉,然後使用 Policy。
R2(config)#int ethernet 1/0
R2(config-if)#no flow-sampler MAP_NETFLOW_SAMPLER
R2(config-if)#no flow-sampler MAP_NETFLOW_SAMPLER egress
R2(config-if)#service-policy input POLICY_NETFLOW_FILTER
由於 Policy 通过 Class 来宣告应用那条 Sampler,这意味着我们可以为不同的 Traffic 类型使用不同的 Sampling Rate。
R2#show policy-map POLICY_NETFLOW_FILTER
  Policy Map POLICY_NETFLOW_FILTER
    Class CLASS_1
      netflow-sampler: SAMPLER_1
    Class CLASS_2
      netflow-sampler: SAMPLER_2
    Class CLASS_3
      netflow-sampler: SAMPLER_3
    Class class-default
      netflow-sampler: SAMPLER_DEFAULT
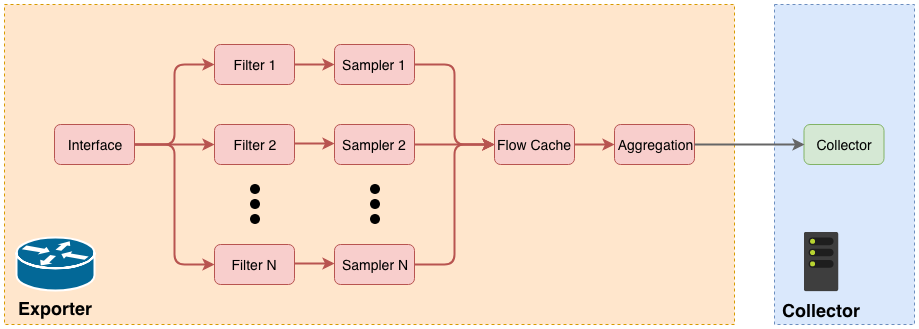
NetFlow 处理流程
最後总结一下整个 NetFlow 处理流程如下图。
相關主題
Jan Ho 2021-07-22
Posted In: 网络服务 Services
发表回复